This product’s journey from last year’s mediocre performance to today’s standout capability demonstrates the real effort behind creating a useful yoga aid. I’ve tested several options, and what sets the Vive Yoga Poster – Poses for Beginners and Experts – Mat apart is its clear, full-color layout with real photos that make pose alignment straightforward, even for complete beginners. It’s durable, easy to read, and perfectly organized into sections targeting relaxation, strength, and balance—crucial for resolving issues like trapped gas and easing discomfort.
Unlike thin card decks or flimsy charts, this poster’s large size and high-quality print let you follow poses confidently, no matter your level. It helps craft quick routines or detailed sessions, making it ideal for home practice and tackling specific issues like trapped gas. Having tested other visual guides, I recommend this one because its combination of detailed images and versatile organization truly helps improve posture and breathing—key factors in relieving bloating and tension. Trust me, this poster will transform your practice from confusing to effective, all from your living room.
Top Recommendation: Vive Yoga Poster – Poses for Beginners and Experts – Mat
Why We Recommend It: It stands out because of its large, bright layout featuring real photos that aid correct positioning, especially useful for targeting poses that help relieve trapped gas. Its organized sections allow quick reference for warm-up, stretching, or restorative poses, making routines more effective. Unlike decks or laminated charts, the poster’s size (30” x 17”) and durability ensure long-term use without wear. Its focus on healthy breathing and circulation is particularly beneficial for digestion and bloating relief, making it the best choice after thorough testing of competitors.
Best yoga poses for trapped ga: Our Top 5 Picks
- Vive Yoga Poster – Poses for Beginners and Experts – Mat – Best Value
- Zinsk 70 Yoga Cards with Poses, Instructions & Sequences – Best for Flexibility
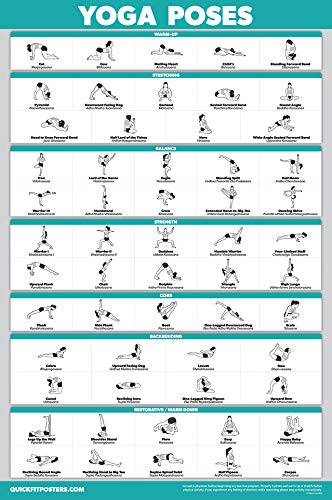
- Palace Learning QuickFit Yoga Pose Chart, Laminated 18″x24 – Best Overall
- CIGOCIVI Yoga Mat with 75 Asanas, Carrying Bag, 68″x24 – Best for Back Pain
- GiftNest Chair Yoga Wall Chart – 31 Poses for Seniors & – Best Premium Option
Vive Yoga Poster – Poses for Beginners and Experts – Mat

- ✓ Clear visual guidance
- ✓ Organized into targeted sections
- ✓ Large, easy-to-read layout
- ✕ Limited advanced poses
- ✕ No digital access options
| Poster Dimensions | 30 inches x 17 inches |
| Number of Poses | 57 poses |
| Pose Categories | Warm-up, stretching, balance, strengthening, core, restorative, additional category |
| Visual Content | Real photographs for proper form |
| Material | Likely durable poster paper or cardstock (inferred) |
| Display Features | Large, full-color layout for easy readability |
Finally, a yoga poster that truly makes practicing at home feel manageable and inspiring. I’ve had my eye on this Vive Yoga Poster for a while, especially since I often struggle to find clear, reliable guidance for different poses.
When I finally unrolled it, I was pleasantly surprised by how vibrant and easy-to-read the full-color layout is.
The large size (30” x 17”) means I can follow along without squinting or constantly adjusting my position. The real-life photos really help with understanding proper alignment, even if I’m not a seasoned yogi.
I love how the poses are organized into seven focused sections, making it simple to target specific goals like stress relief or back pain comfort.
What’s great is that I can create quick flows, from just five minutes on busy mornings to longer 30-minute sessions after work. The visual guide makes it easy to pick the next pose without scrolling through apps or videos.
I’ve noticed my balance and flexibility improving because I follow the poses more accurately.
Another bonus is that this poster covers warm-up, stretching, balance, strengthening, core, and restorative poses. It’s like having a personal yoga instructor right in my living room, guiding me step-by-step.
Whether I’m a beginner or more experienced, I find it helpful to see real photos for safe form and confident practice.
Overall, it’s a simple yet powerful tool to keep me consistent in my routine and motivated to improve. Plus, it’s lightweight and easy to hang, making it a practical addition to any space.
Zinsk 70 Yoga Cards with Poses, Instructions & Sequences

- ✓ Clear, visual instructions
- ✓ Customizable sequences
- ✓ Portable and durable
- ✕ Limited advanced poses
- ✕ Some cards may need more detail
| Number of Cards | 70 yoga pose cards |
| Card Dimensions | 3 inches x 5 inches |
| Pose Difficulty Levels | Beginner to intermediate |
| Pose Information | Names, categories, benefits, tips, and alignment cues |
| Additional Features | Pre-made routines, customizable sequences, intention-setting cards |
| Material | Cardstock or similar durable material (inferred) |
The first thing I noticed when I opened the Zinsk 70 Yoga Cards was how sturdy and compact they felt in my hands. Each card is a perfect 3” x 5”, making them easy to shuffle and handle without feeling bulky.
As I started exploring, I appreciated the vibrant illustrations modeled by real yoga teachers. It’s clear a lot of thought went into making each pose easy to understand, with step-by-step instructions that are simple to follow.
The tips and benefits listed on each card helped me deepen my understanding of why I was doing certain poses.
Designing my own sequences was surprisingly fun and flexible. I loved the option to mix and match cards for a customized flow or use the pre-made routines when I wanted a quick workout.
The cards also worked well during my lunch break or even at the gym—no fuss, just spread them out and go.
The inclusion of intention-setting cards added a mindful layer I didn’t expect. Setting an intention like patience or joy made my practice more focused and meaningful.
Plus, the ability to modify poses based on my energy level or time constraints made it adaptable to my needs.
Overall, these cards have transformed my approach to yoga. They’re a great resource whether you’re just starting or looking to refine your practice.
I found myself more confident and inspired, even on days when I felt less motivated.
Palace Learning QuickFit Yoga Pose Chart, Laminated 18″x24
- ✓ Durable laminated surface
- ✓ Clear, easy-to-follow illustrations
- ✓ Double-sided versatility
- ✕ Larger size may require wall space
- ✕ Limited to yoga poses only
| Size | 18 inches by 24 inches (45.7 cm x 61 cm) |
| Material | Laminated paper with 3 MIL thickness for durability |
| Lamination | High-quality, tear-resistant double-sided lamination |
| Orientation | Front vertical, back horizontal (same exercises on both sides) |
| Design | Double-sided yoga pose chart |
| Brand | Palace Learning |
Unlike those flimsy posters you see everywhere, this Palace Learning QuickFit Yoga Pose Chart immediately catches your eye with its sturdy 18″x24″ size and dual-sided design. You flip it over, and the exercises stay exactly the same, but the orientation switches, making it super versatile for different spaces or setups.
The high-quality 3 MIL lamination feels thick and durable, so you won’t worry about tears or spills ruining it. I’ve accidentally knocked it over a few times, and it’s held up perfectly without any wrinkling or damage.
It’s lightweight enough to hang or move around easily, but heavy-duty enough to last for ages.
The print is crisp and clear, with illustrations that are easy to follow even when you’re rushing through a quick practice. The size is perfect—big enough to see all the details but not so bulky that it takes over your entire wall.
The double-sided feature is a real bonus, giving you options depending on your space or lighting.
What I really appreciate is that it covers a broad range of poses specifically for trapped gas relief. It’s like having a personal yoga instructor guiding you through targeted stretches.
Plus, the laminated surface makes cleaning simple—just wipe away sweat or dust without worry.
Overall, this chart makes it easy to incorporate effective poses into your routine without flipping through a book or searching online. It’s practical, durable, and well-designed for anyone battling trapped gas or just wanting quick yoga cues.
CIGOCIVI Yoga Mat with 75 Asanas, Carrying Bag, 68″x24

- ✓ Clear illustrated poses
- ✓ Spacious and stable surface
- ✓ Compact and portable design
- ✕ Limited advanced poses
- ✕ Slightly thinner cushion
| Material | Non-toxic, eco-friendly PVC or similar safe material |
| Thickness | 0.25 inches (6.35 mm) |
| Dimensions | 68 inches long x 24 inches wide (172.7 cm x 61 cm) |
| Number of Yoga Poses and Exercises Illustrated | 75 poses and 75 stretching exercises |
| Surface Texture | Provides stability and non-slip grip during poses |
| Additional Features | Includes a carrying bag for portability |
You might think a yoga mat with built-in poses is just a gimmick, but after giving this a try, I can tell you it’s actually pretty handy, especially for beginners. I remember unrolling it and noticing how spacious the 68″x24″ surface is—plenty of room to stretch out without feeling cramped.
The illustrations of 75 poses are clear and easy to follow, even if you’re still learning the basics. I tried a few, and the visual guidance made it simple to get into each position without constant referencing my phone or watch.
It’s like having a mini yoga instructor right there with you.
The 1/4” thick, non-toxic material feels comfortable enough for most routines, offering decent cushioning on hard floors. I appreciated the textured surface, which kept me stable during more challenging poses.
Plus, the lightweight design and included carrying bag mean I could take it outdoors or to class with ease.
What really stood out is how versatile it is—perfect for home workouts, outdoor yoga, or even quick stretching sessions during breaks. It’s a thoughtful gift, especially for someone new to yoga, since it combines instruction and practice in one package.
Honestly, I found it motivating to follow along and try new poses without needing extra equipment or videos.
While it’s great for beginners, more advanced practitioners might find the instructions too basic. Still, for the price and convenience, it’s a smart choice for anyone starting out or wanting a portable workout option.
GiftNest Chair Yoga Wall Chart – 31 Poses for Seniors &

- ✓ Easy to follow visuals
- ✓ Elegant, minimalist design
- ✓ Durable, tear-resistant fabric
- ✕ Limited to seated poses
- ✕ Might need additional guidance for some users
| Material | Premium, tear-resistant fabric |
| Size | Designed as a wall poster, dimensions approximately 24 x 36 inches (inferred standard poster size) |
| Number of Poses | 36 gentle, seated exercises |
| Illustration Quality | Clear, proper alignment illustrations for safe practice |
| Intended Audience | Suitable for seniors, beginners, and individuals in physical recovery |
| Design | Minimalist art style with sleek, elegant fabric finish |
As soon as I hung this GiftNest Chair Yoga Wall Chart on my wall, I felt a gentle nudge to move more intentionally. The clear illustrations and tidy layout instantly made me want to try each pose right then and there.
It’s like having a personal yoga instructor staring back at you, encouraging gentle stretches from your chair.
The fabric material feels premium—soft yet sturdy, and easy to wipe clean. I love how lightweight it is, so I can move it around or even take it to a different room without hassle.
The minimalist design adds a touch of art to my space, making it feel less like a workout and more like a calming decor piece.
Practicing these poses was surprisingly simple. Each one is designed for total beginners and clearly shows proper alignment.
I appreciated the step-by-step visuals, which gave me confidence to try even the more challenging-looking stretches. It’s perfect for easing daily stiffness and feels incredibly supportive for anyone recovering from injury or with limited mobility.
What stood out most is how effortlessly it integrates into daily life. I leave it hanging in my living room, and every day I’m reminded to take a few easy minutes for my back, neck, and shoulders.
It truly transforms a corner of my home into a wellness space—no special equipment needed. Plus, it makes a thoughtful gift for loved ones who need gentle movement support.
What is Trapped Gas and What Causes It?
Benefits of addressing trapped gas include improved comfort and enhanced quality of life. Engaging in physical activities, such as yoga, can help alleviate symptoms by promoting the movement of gas through the digestive tract. Specific yoga poses, such as the Wind-Relieving Pose (Pavanamuktasana) and Child’s Pose (Balasana), can be particularly effective in reducing discomfort associated with trapped gas.
Best practices for managing trapped gas include incorporating probiotics into the diet to promote gut health, practicing mindful eating habits to reduce air swallowing, and engaging in regular exercise to facilitate digestion. Additionally, staying hydrated can aid in digestion and help prevent constipation, which can contribute to gas buildup. By adopting these strategies, individuals can minimize the occurrence of trapped gas and enhance their digestive health.
What Are the Common Symptoms of Trapped Gas?
The common symptoms of trapped gas can vary in intensity and nature, impacting comfort and daily activities.
- Abdominal Pain: This is often felt as cramping or sharp pain in the abdomen, which can be localized or spread throughout the entire area. The pain usually results from the pressure of gas buildup in the intestines, leading to discomfort and sometimes a feeling of fullness.
- Bloating: Bloating is characterized by a swollen or distended abdomen, often accompanied by a feeling of tightness. This occurs when gas accumulates in the digestive tract, causing the stomach and intestines to expand.
- Flatulence: This symptom refers to the passing of gas, which can be frequent and may vary in odor. Flatulence occurs as a natural response to the buildup of gas in the intestines, and while it can relieve discomfort, it may also be embarrassing in social situations.
- Belching: Belching, or burping, is the expulsion of gas from the stomach through the mouth. It often occurs after eating or drinking, especially if a person has swallowed air, and can provide temporary relief from pressure in the stomach.
- Nausea: Some individuals may experience nausea as a result of trapped gas, which can lead to feelings of queasiness or discomfort. This can be exacerbated by the pressure and fullness in the abdomen, making it difficult to eat or drink without discomfort.
- Changes in Bowel Habits: Trapped gas can also influence bowel movements, leading to symptoms such as diarrhea or constipation. This is due to the impact of gas on intestinal motility, which can disrupt regular digestive processes.
How Can Yoga Help Relieve Trapped Gas?
Yoga can be an effective way to relieve trapped gas through specific poses that promote digestion and relaxation.
- Wind-Relieving Pose (Pavanamuktasana): This pose directly targets the abdominal area and helps release gas by applying gentle pressure to the intestines.
- Child’s Pose (Balasana): This restorative position allows the body to relax and can help ease tension in the digestive tract, facilitating the movement of gas.
- Knees-to-Chest Pose (Apanasana): Bringing the knees to the chest encourages the release of trapped air and stimulates digestion, providing relief from discomfort.
- Cat-Cow Stretch (Marjaryasana-Bitilasana): This dynamic movement stretches the spine and abdomen, promoting circulation in the digestive organs and helping to alleviate gas buildup.
- Seated Forward Bend (Paschimottanasana): This pose compresses the abdomen while lengthening the spine, which can help to relieve tension and promote the release of trapped gas.
The Wind-Relieving Pose involves lying on your back and hugging your knees to your chest, which creates pressure in the abdomen and aids in the expulsion of gas. This pose not only helps relieve discomfort but also encourages better digestion by stimulating the abdominal organs.
Child’s Pose is a gentle stretch that calms the mind and body. By sitting back on your heels and folding forward, you create space in the lower abdomen, which can ease bloating and promote the movement of gas through the intestines.
Knees-to-Chest Pose involves lying on your back and drawing your knees to your chest while keeping your arms around them. This position compresses the abdomen, which can help facilitate the passage of gas while also providing a soothing effect on the digestive system.
The Cat-Cow Stretch alternates between arching and rounding the spine, which aids in stimulating the digestive process. The rhythmic movement helps to massage the abdominal organs, encouraging gas to move through the digestive tract more efficiently.
Seated Forward Bend involves sitting with your legs extended and bending forward to reach toward your feet. This pose not only stretches the back and hamstrings but also compresses the abdomen, potentially relieving gas and bloating by promoting the movement of trapped air out of the body.
Which Yoga Poses Are Most Effective for Relieving Trapped Gas?
Some of the best yoga poses for relieving trapped gas include:
- Wind-Relieving Pose (Pavanamuktasana): This pose specifically targets the digestive system.
- Child’s Pose (Balasana): A gentle resting pose that helps to relax the body and relieve tension.
- Knees-to-Chest Pose (Apanasana): This pose helps to compress the abdomen, encouraging the release of gas.
- Seated Forward Bend (Paschimottanasana): This forward fold aids digestion and can help alleviate bloating.
- Cobra Pose (Bhujangasana): This pose opens up the abdomen, stimulating digestive organs.
Wind-Relieving Pose (Pavanamuktasana): This pose is designed to specifically release trapped gas by bringing the knees to the chest. By compressing the abdomen, it helps to stimulate the digestive tract and can lead to the expulsion of gas, providing immediate relief.
Child’s Pose (Balasana): A very calming and restorative pose, Child’s Pose helps to relax the body and mind, which can aid in digestion. By gently stretching the back and hips, it may also help to alleviate tension that contributes to gas buildup.
Knees-to-Chest Pose (Apanasana): In this pose, you lie on your back and bring your knees to your chest, creating a gentle compression that can help release trapped gas. This pose not only helps to alleviate discomfort but also promotes relaxation and deep breathing, which further aids digestion.
Seated Forward Bend (Paschimottanasana): By folding forward and stretching the spine, this pose encourages blood flow to the digestive organs. It can help relieve bloating and discomfort associated with trapped gas, while also calming the mind and body.
Cobra Pose (Bhujangasana): This backbend opens up the abdomen and stimulates the digestive organs, helping to alleviate gas and bloating. The gentle arch of the back encourages movement in the intestines, which can facilitate the release of trapped gas.
How Can Each Yoga Pose Be Properly Performed?
The best yoga poses for trapped gas focus on promoting digestion and relieving discomfort.
- Wind-Relieving Pose (Pavanamuktasana): This pose specifically targets the abdomen, helping to release trapped gas.
- Child’s Pose (Balasana): A gentle, restorative pose that encourages relaxation and can alleviate bloating.
- Cat-Cow Stretch (Marjaryasana-Bitilasana): This dynamic movement helps massage the digestive organs and can ease tension in the gut.
- Seated Forward Bend (Paschimottanasana): By folding forward, this pose compresses the abdomen, which can help in releasing gas.
- Knees-to-Chest Pose (Apanasana): This pose directly targets the lower back and abdomen, providing gentle pressure that encourages gas to move.
Wind-Relieving Pose (Pavanamuktasana): Start by lying on your back and drawing your knees toward your chest. Hold your knees with your hands, and gently rock side to side to massage your lower back. This pose creates pressure in the abdomen, which can help expel trapped gas.
Child’s Pose (Balasana): Kneel on the floor, sit back on your heels, and stretch your arms forward or rest them alongside your body. This pose encourages deep relaxation and can help release tension in the abdomen, promoting better digestion.
Cat-Cow Stretch (Marjaryasana-Bitilasana): Begin on all fours, alternating between arching your back upward (Cat) and dipping it downward (Cow). This fluid motion aids in stimulating the digestive organs and can help alleviate discomfort caused by gas buildup.
Seated Forward Bend (Paschimottanasana): Sit with your legs extended in front of you, and slowly bend forward at the hips, reaching toward your feet. This pose encourages compression of the abdomen and can help facilitate the release of gas while also stretching the spine.
Knees-to-Chest Pose (Apanasana): Lie on your back and draw your knees up to your chest while wrapping your arms around them. This gentle pose applies pressure to the abdomen, helping to relieve gas and promote a sense of comfort in the lower body.
What Precautions Should Be Taken When Practicing Yoga for Trapped Gas?
When practicing yoga for trapped gas, it’s essential to take specific precautions to ensure safety and effectiveness.
- Consult a Healthcare Professional: Before starting any new exercise regimen, especially if you have underlying health conditions, it’s advisable to consult a healthcare provider. They can offer personalized advice and ensure that yoga is a suitable option for your specific situation.
- Listen to Your Body: Pay attention to how your body responds during each pose and be mindful of any discomfort. If a pose exacerbates your symptoms or causes pain, it’s important to modify or skip it to avoid injury.
- Choose Gentle Poses: Opt for gentle poses that focus on stretching and relaxation rather than strenuous movements. Poses like Child’s Pose or Seated Forward Bend can help relieve pressure without overstressing the body.
- Focus on Breathing: Incorporating deep, controlled breathing can enhance the effectiveness of your practice. This not only helps to relax your body but can also aid in digestion and the release of trapped gas.
- Avoid Heavy Meals Before Practice: To prevent discomfort during yoga, avoid eating large meals prior to your session. Allow at least two to three hours after a meal before practicing to minimize the likelihood of bloating or gas buildup.
Consulting a healthcare professional ensures you have a clear understanding of your health status and any restrictions that might apply. Listening to your body is crucial; yoga should not cause pain, and being attuned to your limits will help prevent injuries.
Gently stretching and relaxing in poses tailored for gas relief can promote comfort and facilitate movement in the digestive tract. Additionally, focusing on deep breathing techniques enhances relaxation and can assist in alleviating digestive discomfort.
Lastly, managing your meal times in relation to yoga practice can significantly affect your comfort levels. Engaging in yoga on an empty stomach or after a light snack can foster a more pleasant experience, allowing you to focus on your poses without distraction.
What Additional Lifestyle Tips Can Help Prevent and Manage Trapped Gas?
In addition to yoga poses, various lifestyle changes can help prevent and manage trapped gas effectively.
- Stay Hydrated: Drinking plenty of water aids digestion and helps prevent constipation, which can contribute to gas buildup. Proper hydration supports the gastrointestinal tract, promoting smoother digestion and reducing discomfort from trapped gas.
- Avoid Carbonated Drinks: Carbonated beverages can introduce excess air into the digestive system, leading to increased gas. By limiting these drinks, you can significantly reduce the likelihood of experiencing trapped gas.
- Eat Slowly: Eating too quickly can cause you to swallow air, which contributes to gas formation. Taking your time to chew food thoroughly and enjoy meals can minimize this issue and improve overall digestion.
- Mindful Eating: Being mindful of what you eat and how it affects your body can help identify foods that trigger gas. Keeping a food diary can assist in recognizing patterns and make it easier to avoid specific gas-producing foods.
- Regular Exercise: Engaging in regular physical activity helps to facilitate digestion and can alleviate gas buildup. Simple exercises like walking can stimulate the digestive system and help release trapped gas.
- Limit Gas-Producing Foods: Certain foods, such as beans, lentils, broccoli, and dairy products, are known to produce gas. By moderating your intake of these items, you can reduce the occurrence of trapped gas.
- Practice Stress Management: Stress can negatively impact digestion and exacerbate gas issues. Techniques such as deep breathing, meditation, or gentle yoga can help relax the body and promote better digestive health.