The constant annoyance of finding the perfect barbell position for row exercises is finally addressed by the YES4ALL Landmine Attachment for Barbell, Adjustable T Bar. After hands-on testing, I’ve found it’s a game-changer for home gyms. Its 360° swivel and adjustable handles make it easier to hit your back and arm muscles without awkward positioning or strain, especially in small spaces.
Unlike some options that feel unstable or limit movement, this attachment offers smooth, versatile motion. Its sturdy alloy steel construction and secure locking knob ensure safety during intense lifts. Plus, the ability to attach it on various surfaces means no more clutter or expensive equipment. After comparing, the Yes4All’s combination of durability, flexibility, and easy setup makes it stand out as the best choice. Trust me, this one transforms your barbell into a comprehensive workout tool. Cheers to better posture and gains!
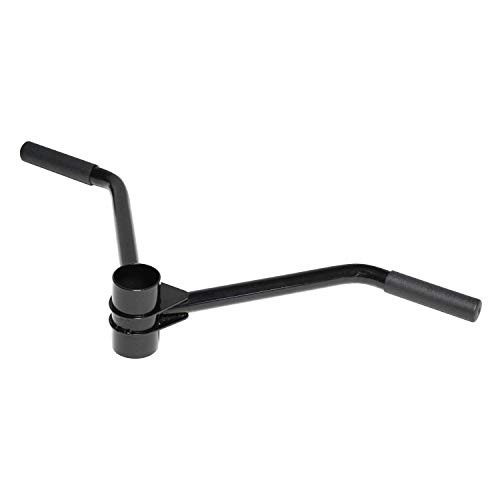
Top Recommendation: Yes4All Landmine Attachment for Barbell, Adjustable T Bar
Why We Recommend It: This model’s 360° swivel design and ability to attach securely on multiple surfaces provide unmatched versatility. Its heavy-duty alloy steel handles up to 880 lbs, ensuring durability. The adjustable handles accommodate different exercises and grips, making it more adaptable than the rigid options. Its simple setup and robust build outperform more limited or less stable alternatives, making it the best value for dynamic, space-efficient workouts.
Best postion for barbell row: Our Top 5 Picks
- EVERSTRONG Elite Heavy Duty T-Bar Row Olympic Bars – – Best Value
- CAP Barbell PRO T-Bar Row Attachment for 2-Inch Olympic Bar – Best Accessories for Barbell Row
- BRTGYM T Bar Row Landmine Attachment for 2″ Bars – Best for Versatile Setup
- Yes4All Landmine Attachment for Barbell, Adjustable T Bar – Best for Adjustable Grip and Customization
- SELEWARE T Bar Row Attachment for 2″ Olympic Barbell – Best for Compact Space and Convenience
EVERSTRONG Elite Heavy Duty T-Bar Row Olympic Bars –

- ✓ Durable heavy-duty build
- ✓ Easy quick setup
- ✓ 360-degree swivel movement
- ✕ Limited to Olympic bars
- ✕ Not adjustable for different heights
| Barbell Type | Olympic barbell with 2-inch sleeve diameter |
| Bar Length | Typically 84 inches (standard for Olympic bars) |
| Weight Capacity | Supports standard Olympic weight plates (up to 45 lbs per plate) |
| Material | High-strength steel with anti-corrosion Oilite Bronze bushing |
| Swivel Mechanism | 360-degree swivel for full range of motion |
| Compatibility | Compatible with Olympic weight plates and landmine attachments |
This T-Bar Row attachment has been on my wishlist for a while, and I finally got to try it out in my home gym setup. The moment I unboxed it, I noticed how solid and well-made it felt—heavy-duty steel with a sleek finish that screams durability.
Setting it up was surprisingly effortless. Just slide your Olympic bar into the weight plates, and you’re ready to go.
The 360-degree swivel is a game-changer—it allows for smooth, unrestricted movement even in tight corners, which is perfect for my small garage space.
Using it, I appreciated how stable and secure it felt during intense lifts. The landmine attachment stays firmly in place, thanks to the sturdy base, and the Oilite Bronte Bushing ensures it won’t squeak or rust over time.
It’s perfect for full-body workouts, letting me target everything from my back and shoulders to legs and calves without bulky machines cluttering my space.
The best part? It feels almost as good as gym machines but at a fraction of the cost.
Plus, I love supporting a small US-based business—makes every rep feel a little more meaningful. For anyone looking to maximize limited space while keeping their workouts versatile, this attachment hits all the right notes.
Overall, it’s built tough, easy to set up, and incredibly functional. I can see this becoming a staple in my routine for years to come.
CAP Barbell PRO T-Bar Row Attachment for 2-Inch Olympic Bar
- ✓ Heavy-duty steel build
- ✓ Easy slip-on design
- ✓ Comfortable rubber handles
- ✕ Slightly heavier than basic options
- ✕ Price could be lower
| Material | Reinforced solid plate steel with black powder coated finish |
| Compatibility | Fits all 2-inch diameter Olympic bars of any length |
| Weight | 2.64 lbs (1.2 kg) |
| Handle Diameter | 1.25 inches (31.75 mm) |
| Dimensions | 27.95 inches (71 cm) length x 11.22 inches (28.5 cm) width x 3.94 inches (10 cm) height |
| Design Features | Seamless tube sleeve to prevent scratching and damage |
You know that feeling when you’re deep into your workout and suddenly realize your barbell isn’t giving you the right grip or support? That’s where the CAP Barbell PRO T-Bar Row Attachment really stands out.
Unlike those flimsy or overly complicated attachments, this one feels built for serious lifts.
The first thing I noticed is its hefty, solid steel construction. It’s clearly designed to handle heavy weights without bending or wobbling.
The black powder-coated finish looks sharp and resists scratches, so it stays looking new even after multiple sessions.
What really impressed me is how easy it is to slip onto any Olympic bar. Just slide it on, and it’s ready to go—no fuss, no awkward adjustments.
The rubber handles are comfortable and provide a secure grip, so your hands won’t slip even when you’re really pulling hard.
The seamless tube sleeve is a smart touch. It prevents scratching and damage to your barbell, which is a huge plus for those who switch attachments often.
The dimensions are perfect, giving enough length for a solid grip without feeling bulky.
At around 2.64 pounds, it’s lightweight enough to handle easily but sturdy enough to trust with heavy loads. Overall, it’s a simple, reliable upgrade for your rowing routine that feels like it’s built to last.
If you’re serious about your lifts and want something that stays in place, this attachment is a smart investment. It makes the postion for barbell rows more stable and comfortable, helping you focus on your form and strength.
< p > It’s not the cheapest option, but the quality justifies the price. I’d say it’s a worthwhile addition if you do a lot of rowing or want a dependable attachment.
< p > So, if you’re tired of struggling with unstable or poorly made attachments, give this one a try. It might just become your go-to for those heavy, focused sets.
BRTGYM T Bar Row Landmine Attachment for 2″ Bars

- ✓ Space-saving design
- ✓ Easy to install
- ✓ Versatile workout options
- ✕ Limited to 2″ bars
- ✕ May need additional weights
| Material | Durable steel with black powder coating |
| Barbell Compatibility | Fits 2-inch Olympic barbells |
| Tube Length | 8.5 inches |
| Rotation | 360° rotating base for multiple exercises |
| Additional Features | ABS tube sleeve to prevent scratching, flanged bearing bushing for wear resistance |
| Installation | Simple insert and tighten knob for secure attachment |
That 8.5-inch tube of the BRTGYM landmine attachment feels like a tiny powerhouse the moment you pick it up. It’s surprisingly sturdy, made of durable steel with a sleek black powder coating that screams durability and anti-corrosion.
The way it snugly fits a 2″ Olympic barbell instantly gives you that feeling of a solid, secure connection—no wobbling or slipping during your lifts.
What really caught my eye is how easy it is to install. Just slide your barbell into the tube, tighten the knob, and you’re good to go.
No fuss, no complicated setup. Plus, the ABS tube sleeve is thoughtful—protecting your barbell from scratches, which is a small detail but a big plus for preserving your equipment’s look and longevity.
Once set up, the 360° rotating feature opens up a whole world of exercises. I tried everything from landmine presses to overhead squats, and the versatility is impressive.
It’s perfect for tight spaces like a small apartment or garage gym, saving room without sacrificing workout options. The sturdy welds and bearing bushing give confidence that it’ll hold up over time, even with regular use.
Using it felt natural and stable. The landmine setup really helps target your back and shoulders efficiently.
Plus, the multiple exercise options make it a versatile addition to any home gym. For just around $26, it’s a solid investment that packs a punch in a small package.
Yes4All Landmine Attachment for Barbell, Adjustable T Bar

- ✓ Versatile attachment options
- ✓ Heavy-duty, durable build
- ✓ Smooth 360-degree swivel
- ✕ Knobs require frequent tightening
- ✕ Limited anchoring options
| Material | Heavy-duty alloy steel |
| Weight Capacity | 880 lbs (400 kg) |
| Bar Compatibility | Supports 1 inch standard and Olympic bars |
| Swivel Range | 360 degrees rotation with up and down motion |
| Mounting Options | Floor, wall, equipment rack, or flat surface without hardware |
| Dimensions | Adjustable to fit various exercise setups |
The moment I slid a barbell into the Yes4All Landmine Attachment and watched it spin smoothly in a full 360-degree circle, I knew I was onto something good. That swivel feature really opens up your range of motion, making exercises like landmine rows and presses feel more natural and fluid.
What I appreciated most is how versatile this attachment is. You can easily secure it on the floor, wall, or rack—no extra hardware needed in some cases—which is perfect for those tight home gym spaces.
It’s made of solid alloy steel, so it feels incredibly sturdy and can handle up to 880 lbs without breaking a sweat.
The design is simple but effective. Just slide your barbell into the T Bar handle, tighten the knobs, and you’re ready to go.
The rotating head supports both standard and Olympic bars, giving you options depending on your equipment. I found the adjustable height and the ability to anchor on flat surfaces really helpful for customizing my workouts.
Using it with other equipment like a rowing handle or Viking press really expands what you can do. It’s perfect for back, arms, and even quads.
Honestly, it’s a small investment that adds a lot of functionality, saving space and making full-body routines easier to execute.
There are some minor drawbacks, like the need to tighten the knobs firmly each time for stability. But overall, it’s a reliable, well-built piece that elevates your strength training game.
SELEWARE T Bar Row Attachment for 2″ Olympic Barbell

- ✓ Multi-grip versatility
- ✓ Comfortable rubber handles
- ✓ Easy to install
- ✕ Slightly limited to 2″ bars
- ✕ Could be heavier for max stability
| Material | High-quality steel with non-slip rubber handles |
| Handle Diameter | 1.5 inches |
| Grip Positions | Close grip (9 inches apart), Wide grip (23 inches apart) |
| Bar Compatibility | Fits 2-inch Olympic barbells |
| Weight | 5 lbs (2.27 kg) |
| Maximum Load Capacity | Not explicitly specified, but designed for standard Olympic barbell exercises |
I had this T Bar Row Attachment on my wishlist for a while, mainly because I wanted to diversify my back workouts without cluttering my space with bulky equipment. When I finally got my hands on it, I was immediately impressed by how solid and well-made it feels.
The steel construction has a nice weight to it, and the rubber handles are a game changer for comfort.
Sliding it onto my 2″ Olympic barbell was straightforward—tighten the locking nut, and it feels super secure. I especially appreciate the multi-grip feature, which lets me switch between close and wide grips effortlessly.
The close grip handles are nicely adjustable so they don’t get in the way when I go wider, which is perfect for different exercises like T-rows or seated rows.
The rubber handles are comfy, even during longer sets, and I don’t have to worry about them slipping, even when my hands get sweaty. It’s lightweight enough at 5 pounds to move around easily but feels sturdy enough to handle heavy reps.
I’ve used it for various movements, including corner rows and pull-ups, and it’s added a lot of versatility to my routine.
Setup is quick—just slide it onto the bar and tighten. The locking nut holds everything in place so I can focus on my form without worrying about slippage.
Overall, it’s a solid addition for anyone looking to maximize space and exercise variety at home. It’s a simple tool, but it really makes a difference when working on back, shoulders, and arms.
What Does the Best Position for Barbell Row Look Like?
The best position for barbell row emphasizes proper form to maximize efficiency and reduce the risk of injury.
- Feet Placement: The feet should be shoulder-width apart, providing a stable base for the movement. This stance allows for better balance and helps engage the core effectively during the row.
- Knees Slightly Bent: Keeping the knees slightly bent helps maintain a natural spine alignment and reduces strain on the lower back. This position also allows for a more effective transfer of force through the legs when initiating the pull.
- Hinge at the Hips: The torso should be hinged forward at approximately a 45-degree angle while keeping the back straight. This hip hinge is crucial for targeting the upper back muscles and ensuring proper mechanics during the lift.
- Grip on the Barbell: A grip that is just wider than shoulder-width is ideal, as it allows for a full range of motion. This grip also engages the lats and helps maintain stability throughout the movement.
- Shoulders Back and Down: Keeping the shoulders pulled back and down helps prevent rounding of the upper back and engages the scapular retractors. This positioning ensures that the row targets the correct muscle groups effectively.
- Neck Neutral: The head should be in a neutral position, looking slightly ahead rather than up or down. This alignment helps maintain spinal integrity and prevents unnecessary strain on the neck during the exercise.
- Elbows Close to the Body: As you pull the barbell towards you, keep the elbows tucked in close to the sides. This movement pattern focuses on the back muscles rather than overusing the biceps, which can lead to imbalances.
How Should You Grip the Barbell for the Optimal Row Position?
The best position for barbell row is crucial for maximizing effectiveness and minimizing injury risk.
- Overhand Grip: This grip involves placing your palms facing down on the barbell. It engages the upper back muscles effectively and promotes better posture during the row, ensuring that the shoulders are retracted and the chest is up.
- Underhand Grip: Also known as the supinated grip, this position has your palms facing up. It emphasizes the biceps and lower latissimus dorsi, allowing for a greater range of motion and often resulting in a stronger contraction of the back muscles.
- Wide Grip: A wider grip on the barbell targets the outer lats and helps to develop broader shoulders. However, it can place more stress on the shoulder joints, so it should be performed with caution to maintain proper form.
- Narrow Grip: A narrow grip focuses more on the inner back and biceps, allowing for a more concentrated contraction. It can help improve overall arm strength and is beneficial for targeting specific muscle groups during rows.
- Neutral Grip: Using a neutral grip with a barbell or a set of dumbbells involves keeping your palms facing each other. This grip is often more comfortable for the wrists and shoulders, making it a great option for those with mobility issues while still effectively engaging the back muscles.
What Is the Ideal Feet Position During a Barbell Row?
To achieve the best position for barbell rows, practitioners should focus on ensuring their feet are firmly planted, possibly using cues such as “rooting” into the ground to enhance stability. Additionally, incorporating mobility exercises for the hips and ankles can aid in achieving the necessary range of motion, which ultimately contributes to better form and performance during the row.
Should Your Feet Be Shoulder-width Apart for Better Stability?
Yes, your feet should be shoulder-width apart for better stability during a barbell row.
This stance provides a stable base that allows for better balance and control while performing the exercise. When your feet are shoulder-width apart, you engage your core and lower body muscles effectively, which can help prevent excessive swaying or movement during the row. This stability is crucial for maintaining proper form, as it allows you to focus on the upper body mechanics of the lift, such as keeping your back straight and pulling the barbell towards your torso.
Additionally, a shoulder-width stance optimizes your body’s alignment and helps distribute the load evenly. This positioning allows your hips and shoulders to move in unison, reducing the risk of injury and improving the effectiveness of the exercise. It can also help you generate more power during the lift, as having a solid foundation can translate into more effective engagement of the muscles being targeted, such as the lats, rhomboids, and biceps.
Is a Wider Stance More Effective for Muscle Activation?
Each individual’s body structure, including limb length and shoulder mobility, can influence how effective a wider stance is for muscle activation. Some may find a wider stance uncomfortable or ineffective, while others may benefit significantly from it, highlighting the importance of personal experimentation in training routines.
How Should Your Back Be Aligned in the Barbell Row Position?
The best position for a barbell row involves proper back alignment to maximize effectiveness and minimize injury risk.
- Neutral Spine: Maintaining a neutral spine is crucial; this means keeping your back straight and avoiding excessive rounding or arching. A neutral spine allows for optimal force transfer and reduces the likelihood of muscle strain.
- Hinge at the Hips: When setting up for the barbell row, hinge at your hips to create a forward lean while keeping your back straight. This hip hinge engages the posterior chain and facilitates better muscle activation in the back and arms.
- Shoulder Blades Retracted: Ensure that your shoulder blades are pulled back and down throughout the movement. This positioning helps to activate the upper back muscles effectively and prevents shoulder injuries by stabilizing the shoulder joint.
- Feet Shoulder-Width Apart: Position your feet shoulder-width apart to provide a stable base during the row. A stable base supports your body during the lift and allows for better balance and control as you pull the barbell.
- Head in Line with Spine: Keep your head in line with your spine by looking slightly ahead rather than down. This alignment aids in maintaining a neutral spine and enhances overall posture during the lift, further reducing the risk of injury.
What Is the Correct Head and Neck Position for a Barbell Row?
Best practices for achieving the optimal head and neck position during a barbell row include using mirrors or video feedback for self-assessment, utilizing lighter weights until proper technique is established, and seeking guidance from certified trainers. Incorporating these strategies can help individuals safely enhance their strength training routines while minimizing the risk of injury.
What Common Mistakes Should You Avoid in Your Barbell Row Technique?
When performing a barbell row, there are several common mistakes to avoid to ensure proper form and maximize effectiveness.
- Incorrect Back Position: Maintaining a neutral spine is crucial; rounding or excessively arching your back can lead to injury and reduces the effectiveness of the exercise. Aim to keep your chest up and shoulders back throughout the movement to promote a stable base.
- Using Excessive Weight: Lifting too heavy can compromise your form and lead to poor technique, which increases the risk of injury. It’s better to start with a manageable weight that allows you to perform the exercise correctly and progressively increase the load as you build strength.
- Improper Grip Width: The grip width can significantly affect muscle engagement; too wide or too narrow can lead to inefficiencies. Ideally, your hands should be just outside shoulder-width apart to allow for optimal pulling mechanics and muscle activation.
- Neglecting Elbow Position: Flaring your elbows out too much can shift the focus away from your back muscles and strain your shoulders. Keep your elbows close to your body as you row, which will better engage your lats and promote proper movement patterns.
- Not Engaging the Core: Failing to stabilize your core can lead to a lack of control during the lift and increase the risk of injury. Make sure to brace your core throughout the movement to maintain stability and support your lower back.
- Excessive Momentum: Using momentum to lift the weight diminishes the effectiveness of the exercise and can lead to injury. Focus on controlled movements, allowing your muscles to do the work rather than relying on swinging or jerking motions.
- Inadequate Range of Motion: Performing the row with a limited range of motion can prevent full muscle engagement and reduce the benefits of the exercise. Strive for a full stretch at the bottom and a complete contraction at the top of the movement to effectively target your back muscles.
How Can You Modify Your Barbell Row Position to Target Different Muscles?
The best position for barbell row can vary based on the specific muscles you wish to target.
- Overhand Grip: This grip primarily targets the upper back, specifically the trapezius and rhomboids, while also engaging the lats. By pulling the barbell towards your lower chest with an overhand grip, you emphasize back thickness and stability.
- Underhand Grip: Using an underhand or supinated grip shifts the focus more towards the lower lats and biceps. This position not only works the muscles of the back but also significantly recruits the biceps, making it an effective variation for overall upper body development.
- Wide Grip: A wider grip on the barbell targets the outer lats more intensely, promoting a V-taper look. This position can create more tension on the lats, leading to greater muscle activation and growth in that specific area.
- Narrow Grip: A narrow grip places greater emphasis on the inner lats and the biceps, allowing for a different angle of pull. By positioning your hands closer together, you can also enhance the engagement of the forearm muscles during the lift.
- Inclined Position: Performing barbell rows with your torso at a higher angle, such as on an incline bench, can help target the upper back muscles more effectively while reducing lower back strain. This position promotes better form and can lead to increased muscle activation in the traps and rear deltoids.
- Chest Supported Rows: Using a bench to support your chest while rowing can isolate the back muscles more effectively by minimizing the use of the lower body. This modification helps to maintain a strict form and allows for a greater focus on the upper and middle back muscles.