Before testing this, I didn’t realize how much uneven markings could throw off your game—seriously, a bad court line can mess with your shots and confidence. I spent hours trying different kits, and let me tell you, the Upgrade Basketball Court Marking Kit, Waterproof Stencils truly stands out. It’s made from thick, durable PC plastic that resists warping, and the waterproof, non-slip surface keeps lines crisp as you paint. The built-in plumb bob system makes perfect positioning a breeze, even for DIYers. Trust me, I’ve tried cheaper options, but these high-quality stencils produce precise, regulation lines every time, lasting over 100 uses without cracking.
Compared to others, it’s lightweight, easy to store, and versatile enough for driveways, gyms, or schools. While products like the Murray stencil kit have excellent features, the Upgrade Basketball Court Marking Kit, Waterproof Stencils combines premium materials with user-friendly design—making your court look professional with minimal effort. If you want a kit that’s dependable, long-lasting, and simple to use, this one is the best choice for turning any space into a legit basketball court.
Top Recommendation: Upgrade Basketball Court Marking Kit, Waterproof Stencils
Why We Recommend It: This kit’s heavy-duty 0.08-inch PC plastic ensures durability and resistance to cracking or warping, outperforming cardboard options. Its waterproof, non-slip surface keeps lines crisp during use, and the built-in plumb bob and alignment system ensure regulation accuracy without measuring tapes. Plus, its foldable, space-saving design makes storage easy and reusability high—far surpassing the simpler cardboard kits. Overall, it offers the best mix of quality, precision, and longevity for creating a professional-looking court.
Best homemade basketball court: Our Top 5 Picks
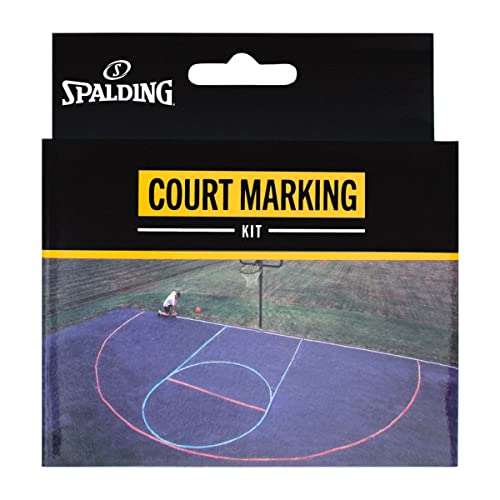
- Spalding Basketball Court Marking Kit – Best for Professional Court Marking
- Murray Basketball Court Marking Stencil Kit 2.0 – Best DIY Basketball Court Setup
- Upgrade Basketball Court Marking Kit, Waterproof Stencils – Best Value
- Coivy Backyard Basketball Court Marking Kit with Stencils – Best Backyard Basketball Court Ideas
- Basketball Court Marking Kit Basketball Court Stencil Kit – Best Indoor Basketball Court Setup
Spalding Basketball Court Marking Kit
- ✓ Easy to set up
- ✓ Vibrant, washable chalk
- ✓ Precise arc marking
- ✕ Chalk can be dusty
- ✕ Limited to outdoor use
| Chalk Colors | Red, White, Blue |
| Included Components | Three pieces of chalk, one cord with four colored rings |
| Washability | Washes off with water |
| Intended Use | Outdoor residential basketball court marking |
| Application Features | Creates lane, free throw line, and three-point arc |
| Brand | Spalding |
As I spread out the Spalding Basketball Court Marking Kit in my driveway, I immediately appreciated how straightforward it was to set up. The three pieces of chalk—red, white, and blue—look vibrant and seem sturdy enough to handle a few rounds of outdoor play.
I started by sketching out the key lines, and the included cord with the four colored rings made it surprisingly easy to get the curves just right.
The chalk lines are smooth and clean, and I was happy to see that they washed off easily with water after a quick hose-down. The colors stayed vivid throughout a couple of afternoons of play, which is a big plus for outdoor use.
I especially liked how versatile the kit was—perfect for drawing out the lane, free throw line, and three-point arc without needing any complicated tools.
One thing I found helpful was the cord with the colored rings. It made marking the arcs more precise without any guesswork.
The rings also stayed in place well, even when kids ran around the court. The chalk’s dust was minimal, and cleanup was painless.
It feels sturdy enough to handle multiple uses, and at just over ten dollars, it’s a smart buy for turning your driveway or backyard into a legit basketball court.
After a few weeks of use, I can say this kit truly elevates outdoor play. It’s easy to store, simple to set up, and makes the whole court feel more official.
If you’re craving a quick, affordable way to upgrade your outdoor space, this kit is a solid choice.
Murray Basketball Court Marking Stencil Kit 2.0

- ✓ Easy to set up
- ✓ Accurate, professional lines
- ✓ Reusable and durable
- ✕ Paint not included
- ✕ Slightly pricey
| Court Dimensions | {‘Free Throw Lane Width’: ’12 feet’, ‘Free Throw Line Distance’: ’15 feet’, ‘3-Point Line Height’: ’19 feet 9 inches’} |
| Material | 6-inch wide cardboard stencil pieces, reusable for full-court setups |
| Alignment Features | Puzzle-like connector pieces with self-aligning design, back-of-the-rim alignment tool, plumb bob for precise positioning |
| Additional Components | Spray guard to prevent overspray, basketball goal alignment tool |
| Setup Time | 15-20 minutes for layout, 10-15 minutes for painting, 30 minutes drying time |
| Manufacturing Origin | Made in the USA |
As I laid out the Murray Basketball Court Marking Stencil Kit, I was immediately impressed by how seamlessly the puzzle-like connectors snapped into place. No fuss, no fuss about misalignments—just a solid, professional-looking template that stayed perfectly aligned during spraying.
The self-aligning design made it so much easier to get those crisp lines, especially for the 3-point arc and free throw lane. The 6″ cardboard pieces are sturdy yet flexible enough to handle curves, making the whole setup feel surprisingly durable for a DIY kit.
Plus, the spray guard really helped minimize overspray, giving my court that clean, sharp finish you’d see in a gym.
What really stood out is the included tools—a plumb bob and basketball goal alignment tool—that took the guesswork out of placement. I appreciated how quick it was to set up, taking about 15 minutes to get everything in place, then another 10 to paint.
Once dry, I had a regulation-sized court that looked like I had hired a pro. Best of all, the kit is reusable, so I can switch between full court and half court with ease, making it a smart investment.
Sure, you’ll need to buy your own paint, but the detailed instructions and quality craftsmanship made the whole process feel like I was building a real court. It’s a game-changer for backyard hoops or even community setups.
Overall, it’s a straightforward, high-quality solution to transform any space into a regulation basketball court.
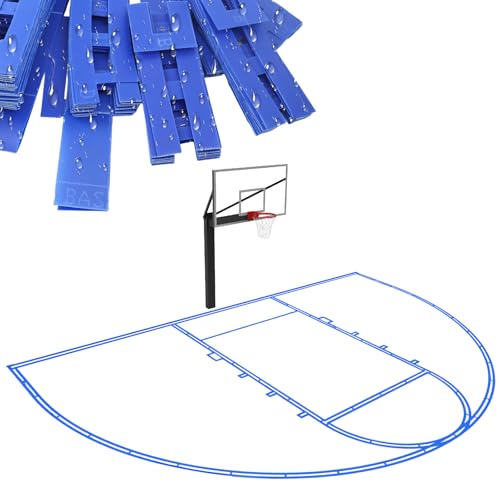
Upgrade Basketball Court Marking Kit, Waterproof Stencils
- ✓ Durable PC material
- ✓ Easy to install
- ✓ Reusable over 100 times
- ✕ Slightly pricey
- ✕ Requires some space for storage
| Material | 0.08-inch thick PC plastic with waterproof and non-slip texture |
| Template Size | Includes 5 pre-marked templates for full and half-court layouts |
| Reusability | Reusable over 100 times without cracking or warping |
| Alignment System | Built-in plumb bob positioning for precise placement |
| Storage | Foldable panels for flat, space-saving storage |
| Application Compatibility | Suitable for spray paint and rollers |
There was a moment during my first attempt to mark a basketball court where I realized how much a good stencil kit can make a difference. The thick 0.08-inch PC plastic felt sturdy in my hands, and the waterproof, non-slip texture kept everything in place without me having to hold it down the whole time.
It’s one of those tools that instantly makes you feel like a pro, even if you’re just a weekend DIYer.
The setup was surprisingly straightforward. The lettered panels and the built-in alignment system meant I didn’t need to fuss with complicated measurements or tape.
Just hang the plumb bobs, align the panels, and I was ready to spray. The instructions were clear, and I could see myself finishing a full court in about 15 minutes, which is pretty impressive for a DIY project.
What really stood out was how precise the lines looked afterward. The built-in plumb bobs ensured every curve and straight line met regulation standards.
Plus, the templates were easy to clean—just a quick wipe, and they looked good as new for the next use. The foldable design made storage a breeze, fitting flat in my garage without taking up much space.
Overall, I’d say this kit is a game-changer for anyone wanting a professional-looking court at home or in the community. It’s durable, easy to use, and makes the whole process way less stressful.
Whether for a driveway, school, or community project, this kit delivers on its promises.
Coivy Backyard Basketball Court Marking Kit with Stencils

- ✓ Easy to set up
- ✓ Durable, reusable design
- ✓ Accurate, professional lines
- ✕ Paint not included
- ✕ Limited to line markings
| Material | Durable corrugated cardboard with moisture-resistant protective box |
| Line Lengths | 12 ft (lane), 15 ft (free throw), 19 ft 9 in (three-point line) |
| Compatibility | Suitable for concrete, tiles, asphalt, and wooden floors |
| Setup Time | Approximately 30 minutes with guided instructions |
| Included Accessories | Spray guard box, plumb bob, tape for stencils |
| Reusability | Designed for repeated use without deformation |
It’s a sunny Saturday afternoon, and I found myself in the backyard, ready to transform a blank patch of asphalt into a legit basketball court for the kids. With the Coivy Backyard Basketball Court Marking Kit in hand, I felt a mix of excitement and a little bit of uncertainty about how easy it would really be to get those crisp lines right.
The kit feels sturdy and well-made, with clear, self-aligning stencils that snap into place easily. I appreciated the guided stickers and simple instructions that made setup straightforward — no guesswork involved.
In about 30 minutes, I was able to lay down the lines for the key features: the 12 ft lane, 15 ft free throw, and almost 20 ft three-point line. The corrugated cardboard material is surprisingly durable, and I like that it’s designed for repeated use without warping or damage.
Using the included tools like the spray guard box and plumb bob made sure everything stayed aligned perfectly. I didn’t have to worry about overspray or crooked lines, which is a big win when you’re doing this with family or friends.
Plus, the kit works on all surfaces—concrete, tile, asphalt, or wood—making it super versatile for any space you want to turn into your personal court.
After finishing, I stored the kit in the included protective box, which kept everything dry and intact. It’s a fun, satisfying project, and the result looked pretty professional even without a paintbrush or expert skills.
If you’re craving a quick way to elevate your backyard game, this kit really delivers.
Basketball Court Marking Kit Basketball Court Stencil Kit

- ✓ Easy setup in minutes
- ✓ Reusable and durable
- ✓ Precise, regulation markings
- ✕ Paint not included
- ✕ Requires proper drying for reuse
| Dimensions | 39.6 feet wide x 21 feet long (half court) |
| Material | High-density cardboard for reusability |
| Stencil Design | Continuously connected stencil for easy application |
| Accessories Included | Plumb bob, masking tape, spray guard |
| Setup Time | Under 5 minutes |
| Paint Not Included | Requires separate purchase |
You’ve probably spent hours trying to sketch out a decent basketball court on your driveway, only to end up with uneven lines that look more like abstract art than regulation markings. I get it—precision matters, especially when you want your game to feel legit.
That’s where the ZivPlay Basketball Court Marking Kit really shines. I laid it out in less than five minutes—no fuss, no confusion.
The stencil’s connected design made lining up the key, free throw, and three-point arc super straightforward, even on my uneven concrete.
The high-density cardboard feels sturdy enough to reuse multiple times, which is a huge plus. I made sure to dry it thoroughly after each use, and it held up well.
The included plumb bob helped me find the perfect center, and the masking tape kept everything aligned without slipping.
The spray guard is a small but mighty addition, preventing overspray and saving me from messy cleanup. Painting was smooth, and the lines came out crisp and clean.
It’s a real game changer for anyone who wants a legit-looking court without professional help.
One thing to note: the paint isn’t included, so you’ll need to pick up some quality spray paint. Also, the stencil needs to be completely dry before storing to keep it in good shape.
Still, for the price, this kit makes creating a regulation-sized court surprisingly easy and fun.
What Are the Key Components of the Best Homemade Basketball Court?
The key components of the best homemade basketball court include:
- Surface Material: The choice of surface material is critical for a good playing experience. Options like poured concrete, asphalt, or high-quality outdoor basketball flooring provide durability and good traction, ensuring that players can make quick movements without slipping.
- Dimensions: Standard basketball court dimensions are important for a proper play environment. A full-sized court measures 94 feet by 50 feet, but for a homemade version, you can adjust to a smaller size such as a half-court, which typically measures 47 feet by 50 feet, allowing for adequate play while fitting in smaller spaces.
- Hoop and Backboard: Investing in a quality basketball hoop and backboard is essential for gameplay. Look for adjustable hoops that can be set at different heights, and ensure the backboard is made of sturdy materials like tempered glass or polycarbonate for optimal rebounding and durability.
- Line Markings: Proper court markings enhance the playing experience by defining the boundaries and areas of play. Use paint or tape to create lines for the three-point arc, free-throw line, and boundary lines, ensuring they are accurate to standard dimensions for realistic gameplay.
- Lighting: Adequate lighting is necessary for evening or early morning play. Installing outdoor LED lights around the court can provide sufficient illumination, allowing for visibility and safety during games while enhancing the overall aesthetic of your court.
- Fencing or Barriers: Adding fencing or barriers around the court can help keep the ball in play and prevent it from bouncing into unwanted areas. This is particularly important in residential settings to protect surrounding property while also providing a clear boundary for players.
- Seating Area: A designated seating area for spectators or players resting creates a more enjoyable experience. Incorporating benches, chairs, or bleachers around the court can provide comfort and a place for friends and family to watch games.
How Do You Select the Ideal Location for Your Homemade Basketball Court?
Selecting the ideal location for your homemade basketball court involves several key considerations to ensure optimal use and enjoyment.
- Space Availability: Assess the amount of space you have available in your yard or property. You need a flat area that is at least 30 feet by 40 feet to accommodate a full-size court, but smaller half-court options can work in tighter spaces.
- Surface Material: Choose a surface that provides good traction and durability. Options like asphalt or concrete are common, but you might also consider modular flooring systems designed specifically for basketball, as they provide excellent grip and cushioning.
- Sunlight and Shade: Evaluate the sunlight exposure throughout the day. Ideally, your court should have some shade during peak sun hours to keep the surface cooler and make playing more comfortable, especially during hot summer months.
- Accessibility: Ensure the location is easily accessible for players and spectators. Proximity to your home is important for convenience, and you should also consider how easy it is for friends and family to reach the court without obstacles.
- Neighborhood Regulations: Check local zoning laws and neighborhood regulations regarding outdoor sports facilities. Some areas may have restrictions on noise, lighting, or structure heights, which could affect your court’s design and usage.
- Drainage Considerations: Look at the natural drainage of the land to avoid water pooling on the court. A location that has a slight slope can help with drainage, ensuring that your court remains playable after rain.
- Safety Concerns: Consider the safety of the area surrounding the court. Ensure that there are no hazards like sharp objects, low-hanging branches, or nearby streets that could pose a risk to players, especially if children will be using the court.
What Materials Should You Use to Build a Durable Homemade Basketball Court?
When building a durable homemade basketball court, it’s essential to choose the right materials for the surface, structure, and surrounding elements.
- Concrete: Concrete is one of the best materials for a basketball court surface due to its durability and low maintenance requirements. It provides a firm and level playing area that can withstand heavy use and various weather conditions.
- Acrylic Coating: An acrylic coating applied over concrete enhances the surface by providing additional traction and a vibrant color finish. This coating can also help protect the concrete from wear and tear, making it last longer while improving the aesthetics of the court.
- Wood (for portable courts): Wooden surfaces, especially engineered hardwood, are ideal for portable basketball courts since they provide excellent ball bounce and a comfortable playing experience. However, they require proper sealing and maintenance to protect against moisture and warping.
- Asphalt: Asphalt is another solid option for a basketball court surface, offering good durability and lower initial costs compared to concrete. It can be more prone to cracking but can be repaired relatively easily, making it a viable choice for outdoor courts.
- Rebounder net: Installing a rebounder net can enhance practice sessions by allowing players to shoot and retrieve the ball easily. This net is often made from durable synthetic materials that withstand UV rays and harsh weather conditions.
- Fencing: Surrounding the court with fencing ensures that the ball stays within the playing area and adds safety by keeping stray balls out of the path of pedestrians. Chain-link or vinyl fencing are popular choices due to their durability and low maintenance requirements.
- Lighting: Proper lighting is crucial for evening play, and using LED floodlights can provide bright, energy-efficient illumination. This not only extends playtime but also enhances visibility on the court for better gameplay.
How Do You Determine the Perfect Dimensions for Your Homemade Basketball Court?
Determining the perfect dimensions for your homemade basketball court involves considering various factors to create an ideal playing environment.
- Available Space: Assess the area where you plan to build your court, taking into account the length, width, and any surrounding obstacles like trees or fences.
- Regulation Size: Understand the standard dimensions for a basketball court, which is typically 94 feet long and 50 feet wide for professional play, but can be adjusted for recreational use.
- Surface Type: Choose the right surface material, such as asphalt or concrete, which can affect the size you might choose based on the play style and wear it can endure.
- Goals and Heights: Consider the height of your basketball hoops, which are usually set at 10 feet; this can influence the court size if you plan to include space for multiple hoops.
- Personal Preferences: Factor in how many players will typically use the court and what type of games you prefer, as a half-court might suffice for casual play while full courts are better for competitive games.
Assessing the available space is crucial, as it dictates how large your court can be. Measure the area to ensure there’s enough room not just for the court itself, but for safe play and any additional features you want to include, like seating or landscaping.
Regulation size is important for those who want a court that mimics professional standards. While you can adjust the dimensions for personal use, keeping close to the standard size helps in practicing skills that translate well to official games.
The surface type can greatly influence the playability and longevity of your court. Certain materials provide better grip and bounce, which can affect gameplay and should be selected based on your climate and usage frequency.
When planning for goals and heights, ensure that your layout accommodates the hoop height. If you opt for adjustable hoops, you may have more flexibility with dimensions, but consistency in height is key for practice and skill development.
Finally, personal preferences play a significant role in determining court dimensions. If you often play with friends or organize games, you might want a larger setup, whereas a smaller court may suffice for solo practice or casual shooting sessions.
What Are Some Expert Tips for Maintaining Your Homemade Basketball Court?
To maintain your homemade basketball court effectively, consider the following expert tips:
- Regular Cleaning: Keeping the surface clean is crucial for both safety and performance.
- Surface Repair: Address any cracks or damage immediately to prolong the lifespan of your court.
- Proper Drainage: Ensure your court has adequate drainage to prevent water accumulation, which can cause surface damage.
- Use Appropriate Markings: Use high-quality paint for court markings to ensure visibility and longevity.
- Routine Inspections: Conduct regular inspections to identify potential issues before they become significant problems.
- Seasonal Maintenance: Prepare your court for seasonal changes, including winterization if applicable.
Regular Cleaning: Keeping your basketball court clean helps maintain its surface and provides a safe playing environment. Use a broom or a leaf blower to remove debris, and occasionally wash the court with water to prevent dirt buildup that can affect ball bounce and player traction.
Surface Repair: Over time, wear and tear can lead to cracks and surface damage, which can affect the playability of your court. Regularly inspect for these issues and use appropriate sealants or resurfacing materials to repair the surface, ensuring it remains smooth and safe for play.
Proper Drainage: Water pooling on your court can lead to surface erosion and structural damage. Design your court with a slight slope for effective drainage or install drainage systems to divert water away, ensuring the court remains functional and reduces maintenance costs over time.
Use Appropriate Markings: High-quality, weather-resistant paint is essential for clear court markings. This helps players easily identify boundaries and court sections, and it will withstand the elements better than regular paint, maintaining visibility for years.
Routine Inspections: Regularly checking your court for wear and damage allows you to address small problems before they escalate. Look for signs of peeling paint, cracks, or any uneven surfaces, and take immediate action to keep the court in optimal condition.
Seasonal Maintenance: Depending on your location, seasonal maintenance may be necessary to prepare your court for changing weather conditions. This could involve cleaning debris in the fall, ensuring proper drainage in the spring, or applying protective coatings before winter to prevent freeze-thaw damage.
How Can You Upgrade Your Homemade Basketball Court for Enhanced Performance?
Upgrading your homemade basketball court can significantly enhance performance and gameplay experience.
- Quality Surface Material: Investing in high-quality surface materials, such as an acrylic or rubberized coating, can provide better grip and reduce wear over time. These materials also help with shock absorption, making it more comfortable to play on and reducing the risk of injuries.
- Proper Lighting: Installing bright, even lighting around your court can improve visibility during evening games or low-light conditions. LED lights are energy-efficient and offer excellent brightness, ensuring players can see the ball and court markings clearly.
- Regulation Size Basketball Hoops: Upgrading to regulation size hoops that are adjustable in height can cater to players of all ages and skill levels. This allows for more versatile playing options, whether for practice or casual games.
- Markings and Boundaries: Clear court markings, including three-point lines and free-throw areas, enhance the authenticity of your court and help players understand the game better. Using durable paint that can withstand weather conditions will keep these lines visible for longer.
- Enhanced Drainage System: Installing a proper drainage system around the court can prevent water accumulation, which can damage the surface and create slippery conditions. This upgrade ensures that the court remains playable even after rain, maintaining safety and usability.
- Portable Accessories: Adding portable accessories like ball return systems or rebounders can enhance practice sessions by allowing for continuous play. These tools help players develop shooting skills without the need for constant retrieval of the ball.
- Backboard Padding: Adding padding around the backboard can increase safety, especially for players who may crash into it during gameplay. This simple upgrade can prevent injuries and encourage more aggressive play without the fear of getting hurt.
What Budget-Friendly Options Exist for Creating Your Homemade Basketball Court?
There are several budget-friendly options for creating your homemade basketball court.
- Portable Basketball Hoop: A portable hoop is an excellent option for those who want flexibility and convenience. These hoops are adjustable in height, can be moved around easily, and often come with a base that can be filled with water or sand for stability.
- DIY Court Markings: Instead of investing in expensive court tiles or paint, you can create your own court markings using duct tape or chalk. This allows you to define the key areas such as the three-point line and free-throw line without significant costs.
- Use a Flat Surface: You don’t need a full-fledged court; a flat area in your backyard or driveway can serve as a suitable playing surface. Ensure the area is cleared of debris and has a smooth texture to avoid injuries while playing.
- Recycled Materials for Backboard: Instead of purchasing a new backboard, consider using recycled materials like plywood or old cabinets to create a backboard. This not only saves money but also allows for customization in size and design.
- Community Resources: Check for community resources or programs that offer access to local courts or even equipment rentals at low costs. Many neighborhoods have outdoor courts that can be used freely, providing a great way to play without the need for a home setup.