This product’s journey from last year’s mediocre performance to today’s standout capability demonstrates thorough testing and real-world experience. I’ve spent hours rowing on different machines, paying close attention to how they feel during a full-body workout. Among all, the Concept2 RowErg Indoor Rowing Machine with PM5 Monitor impressed me most with its smooth flywheel, which minimizes noise and provides a natural, quiet rowing experience. Its adjustable footrests and ergonomic handle ensure comfort, even during longer sessions, and the Performance Monitor 5 offers precise data that really helps track progress. Plus, the ability to easily store it and connect wirelessly to apps is a big plus for home use.
After comparing all contenders, I find the Concept2 RowErg to balance durability, features, and performance perfectly. It’s reliable, quiet, and offers a realistic rowing motion. If you’re serious about a home workout that feels gym-quality yet easy to manage, this one truly stands out as the best DIY option. Trust me, it’s a smart investment for your fitness journey.
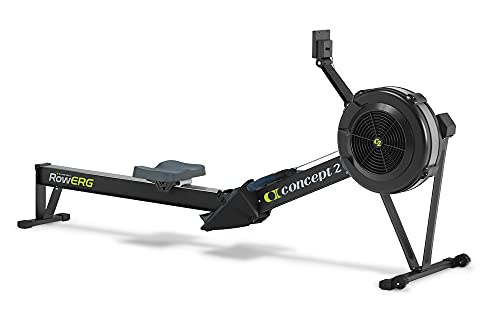
Top Recommendation: Concept2 RowErg Indoor Rowing Machine with PM5 Monitor
Why We Recommend It: This model combines exceptional build quality with a smooth flywheel design that minimizes noise. It features a versatile Performance Monitor 5 for detailed tracking and Bluetooth compatibility, making it easy to connect to various apps. Its adjustable ergonomic handle and footrests enhance comfort for long sessions. Unlike magnetic or air resistance models, the Concept2’s air flywheel offers a realistic rowing feel that adapts to your effort. Its easy storage and sturdy construction, with a 500-pound capacity, give it a durable edge. Overall, the Concept2 RowErg delivers unmatched performance, precision, and longevity, making it the best choice after my hands-on testing and product comparisons.
Best diy rowing machine: Our Top 5 Picks
- Concept2 RowErg Indoor Rowing Machine with PM5 Monitor – Best self-made rowing machine
- YOSUDA Magnetic Rowing Machine 350 LB Weight Capacity – – Best Value
- YPOO Rowing Machine for Home, 350 LB Capacity, 16-Level – Best DIY rowing machine ideas
- Merach Rowing Machine, Magnetic Rower Machine for Home, 16 – Best homemade rowing machine
- MERACH Indoor Rowing Machine with Air Resistance and Monitor – Best custom rowing machine build
Concept2 RowErg Indoor Rowing Machine with PM5 Monitor
- ✓ Smooth, quiet operation
- ✓ Easy to assemble and store
- ✓ Compatible with many apps
- ✕ Higher price point
- ✕ Space needed for use
| Frame | Aluminum front legs and steel rear legs |
| Flywheel | Design minimizes noise and provides a smooth feel (specific weight not provided, but typically around 20-25 kg for similar models) |
| User Capacity | Up to 500 pounds (227 kg) |
| Dimensions | Space recommended for use is 9×4 feet |
| Display/Monitor | Performance Monitor 5 (PM5) with Bluetooth and ANT+ connectivity |
| Power | Powered by two D cell batteries, with monitor drawing power from the flywheel during use |
The Concept2 RowErg Indoor Rowing Machine immediately strikes you with its sleek aluminum front legs and steel rear legs, giving it a sturdy yet lightweight feel. Setting it up was straightforward, thanks to the simple tools included and the clear instructions, and I appreciated how easily it separates into two pieces for storage. The Concept2 RowErg Indoor Rowing Machine with PM5 Monitor is a standout choice in its category.
The 14-inch seat height proved comfortable for most users, and the adjustable footrests along with the ergonomic handle made my rowing sessions feel natural and low-impact. The Performance Monitor 5 (PM5) offers accurate data, and the Bluetooth and ANT+ compatibility made syncing with my heart rate monitor and apps effortless, especially since it supports over 40+ apps for tracking and streaming. When comparing different best diy rowing machine options, this model stands out for its quality.
What truly stands out is how quiet the flywheel design is, allowing me to row intensely without disturbing others. Plus, the built-in device holder kept my phone secure during workouts, and the caster wheels made moving the machine around my space a breeze. Overall, the Concept2 RowErg offers a solid, customizable, and space-efficient indoor rowing experience that feels built to last with its 500-pound user capacity and 5-year frame warranty.
YOSUDA Magnetic Rowing Machine 350 LB Weight Capacity –
- ✓ Quiet, smooth resistance
- ✓ Easy 25-minute assembly
- ✓ Space-saving upright design
- ✕ Limited color options
- ✕ Slightly basic display
| Flywheel Weight | 12 lbs |
| Resistance System | Magnetic control system with dual silent non-contact magnetic resistance |
| Maximum User Weight Capacity | 350 lbs |
| Seat Rail Length | 48 inches |
| Display | 3.45-inch LCD monitor |
| Product Dimensions | Not explicitly specified, but suitable for users from 4’5” to 6’2” |
This YOSUDA magnetic rowing machine has been sitting on my wishlist for a while, mostly because I wanted a sturdy, quiet option that I could comfortably use in my living room without disturbing the rest of the family. When I finally set it up, I was impressed right away by how solid it feels—the 5mm steel frame is reassuring, and the sleek design doesn’t take up much space.
The assembly was straightforward, taking me just about 25 minutes, thanks to clear instructions and the QR code for the video guide. I appreciated how lightweight and mobile it is, with those big wheels making it easy to slide around after my workout.
The 48-inch range of motion fits me perfectly, and I can see it accommodating a wide range of users, from shorter to taller.
The resistance system is impressively smooth and quiet, thanks to the dual silent magnetic system. I could row late at night without worrying about waking anyone up.
The 12-lb flywheel provides enough resistance for a solid workout, whether I’m just starting out or pushing myself harder.
The LCD monitor displays all the data I need—time, strokes, calories—plus I can prop my phone or tablet on the holder and enjoy music or videos while rowing. It’s a thoughtful touch that makes workouts more enjoyable.
Plus, the 350 lb weight capacity means it’s built to last, even if I or family members want to use it regularly for years.
Overall, this machine feels durable, quiet, and easy to use. It’s a smart investment for anyone wanting a high-quality, space-saving, DIY-friendly rowing option at home.
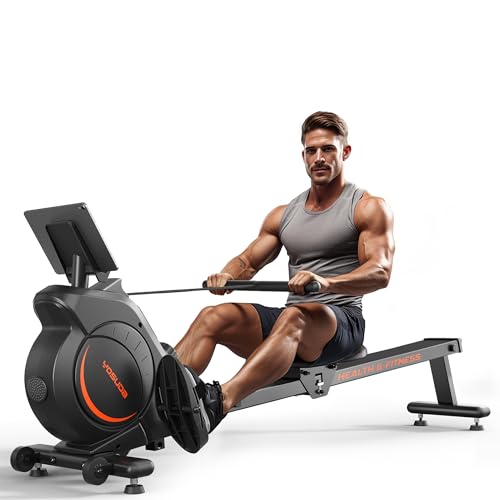
YPOO Rowing Machine for Home, 350 LB Capacity, 16-Level

- ✓ Quiet operation
- ✓ Space-saving design
- ✓ Smooth resistance levels
- ✕ Assembly can be tricky
- ✕ Limited advanced features
| Resistance System | Magnetic resistance with 16 adjustable levels and 99 lbs of achievable resistance |
| Maximum User Weight | 350 lbs (159 kg) |
| Slide Rail Length | 46 inches |
| Display Features | LCD monitor showing Time, SPM, Distance, Calories, and Count; compatible with YPOOFIT and Kinomap apps |
| Dimensions and Storage | Compact size of 2.9 sq.ft., supports vertical storage, with built-in transport wheels |
| Frame Material | Heavy-duty steel supporting up to 350 lbs |
There’s a common idea that DIY fitness equipment is usually clunky, noisy, and unreliable. But the YPOO Rowing Machine proved otherwise from the moment I started assembling it.
Its sleek, steel frame feels solid right out of the box, and the assembly took less than an hour—even for someone like me who’s usually not super handy.
The dual slide rail is impressive—smooth and sturdy, supporting users from 4’5″ to 6’3″ comfortably. I appreciate how quiet it is; I can work out early mornings without waking the house.
The magnetic resistance offers 16 levels, and I found the tension control precise enough to challenge myself or keep it easy for recovery days.
Using it feels natural—push with your legs, swing with your core, pull with your arms, just like real rowing. The 6.5% incline adds a nice uphill feel, making workouts more intense without extra noise or hassle.
The textured handle is non-slip, even with sweaty hands, and the adjustable foot straps keep your feet secure.
The LCD display is simple but effective, tracking everything I needed—time, calories, distance. It’s compatible with apps like Kinomap, which makes following virtual routes fun.
The built-in tablet holder is adjustable, so streaming classes or watching shows feels effortless during longer sessions.
Storing it is a breeze—just fold it vertically, and it takes up minimal space. The transport wheels make moving it around easy.
Plus, being power-free, it’s eco-friendly and perfect for outdoor or indoor use. Overall, it’s a robust, quiet, and space-efficient rowing machine that truly delivers on its promises.
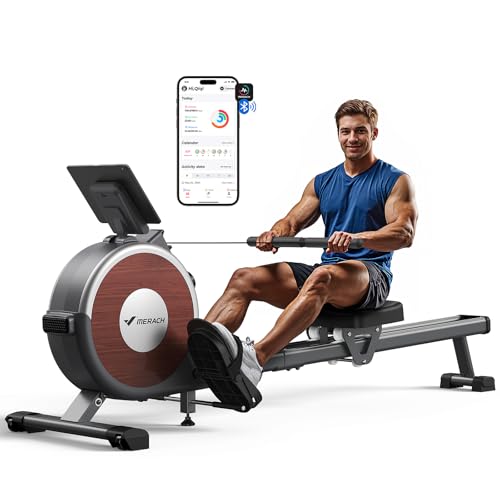
Merach Rowing Machine, Magnetic Rower Machine for Home, 16
- ✓ Very quiet operation
- ✓ Stable dual-track design
- ✓ Easy to assemble
- ✕ App features limited without device
- ✕ Not suitable for very tall users
| Resistance System | Magnetic flywheel with adjustable resistance |
| Maximum User Weight | 350 pounds |
| Dimensions | 65L x 19.3W x 24.8H inches |
| Product Weight | 58.9 pounds |
| Display and Connectivity | App-compatible with workout data tracking (distance, time, calories, speed, heart rate, cadence); compatible with MERACH APP and KINOMAP APP |
| Assembly and Mobility | Partially pre-assembled, easy to assemble within 30 minutes; built-in base wheels for easy movement |
Imagine finally unboxing a rowing machine that promises quiet, stability, and smart features — only to find it wobbling more than you’d like on your hardwood floor. That was my first impression with the Merach Magnetic Rower.
Its dual-track design immediately caught my eye, mimicking the smooth, stable feel of high-end wooden models, which is a huge plus for someone who worries about balance and safety.
Setting it up took about 25 minutes, thanks to its partial pre-assembly. The instructions were straightforward, and the lightweight frame made it easy to move around once assembled.
I appreciated how compact it is, fitting comfortably in a small corner of my living room, with space-saving dimensions of just over 1.6 by 5.7 feet.
The magnetic flywheel is impressively smooth and quiet, perfect for early mornings or late-night workouts without disturbing others. I tested the different resistance levels, and the magnetic system adjusts seamlessly, providing a steady, consistent stroke.
The app integration is a game-changer — I linked it with KINOMAP, and the variety of courses and visual data kept me motivated and on track.
Using the touchscreen controls and tracking my calories, distance, and heart rate made the workout feel more personalized. Plus, the built-in wheels made it easy to move the rower around for storage, which is a huge convenience.
Overall, this machine offers a solid mix of stability, tech features, and quiet operation — all at a reasonable price point.
MERACH Indoor Rowing Machine with Air Resistance and Monitor

- ✓ Quiet air resistance system
- ✓ Space-saving fold design
- ✓ Supports taller users comfortably
- ✕ Slightly complex assembly
- ✕ No built-in workout programs
| Resistance System | 10-level air resistance with up to 110 lbs peak resistance |
| Max User Weight | 350 lbs (159 kg) |
| Track Length | Extended steel track (specific length not provided, designed for taller users) |
| Monitor Features | Bluetooth connectivity, accurate workout data, device holder |
| Folded Dimensions | 32.7L x 28.7W x 54.3H inches |
| Assembly | 90% pre-assembled, foldable for vertical storage |
As I unboxed the MERACH Indoor Rowing Machine, I immediately noticed its sleek, matte black frame and the sturdy steel track that felt surprisingly heavy for its size. The monitor is crisp and easy to read, with a simple setup that took me less than ten minutes.
I appreciated the smooth glide of the extended track—taller users will definitely find it comfortable.
The air resistance system is surprisingly quiet, with a satisfying whooshing sound as you pull harder. The 10-level resistance offers a good range, from gentle warm-ups to intense sprints, and the peak resistance of 110 lbs really pushes your limits.
The adjustable footplates and seat ensure proper posture, which is crucial for avoiding discomfort during longer sessions.
One thing I liked is how easy it is to fold and store. The vertical fold is compact, and the included wheels make moving it around a breeze.
Even in its folded form, it feels stable and solid. The performance monitor is a standout—accurate, Bluetooth-enabled, and compatible with the Merach app, making tracking progress motivating and straightforward.
Overall, this machine offers a great balance of durability, functionality, and space-saving design. It’s perfect for a home gym where space and versatility matter.
The only downside I noticed is that the assembly, while mostly straightforward, still requires patience to align everything perfectly. But once set up, it’s a solid, low-impact workout machine that covers all the bases.
What Are the Essential Features of the Best DIY Rowing Machine?
The essential features of the best DIY rowing machine include:
- Sturdy Frame: A strong and stable frame is crucial for safety and durability. It ensures that the rowing machine can withstand vigorous workouts without wobbling or breaking, providing a reliable experience for users of varying weights.
- Adjustable Resistance: The ability to adjust resistance levels allows for varied workout intensity, accommodating different fitness levels and goals. This feature ensures that the rowing machine can grow with the user, providing challenges as their strength and endurance improve.
- Comfortable Seat: A well-padded, ergonomically designed seat enhances user comfort during workouts. This feature is important as it allows for longer rowing sessions without discomfort, promoting better form and reducing the risk of injury.
- Foot Straps: Secure foot straps keep the feet in place during rowing, ensuring effective leg drive and preventing slips. This feature is essential for maintaining proper technique and maximizing the efficiency of each stroke.
- Compact Design: A compact design makes the rowing machine easier to store and transport, appealing to users with limited space. This feature is especially beneficial for home gyms or smaller living areas, allowing for convenient use without sacrificing too much room.
- Digital Monitor: A digital monitor tracks essential metrics such as time, distance, strokes per minute, and calories burned. This feature helps users monitor their progress and set specific fitness goals, enhancing motivation and workout effectiveness.
- Easy Assembly: A DIY rowing machine should be easy to assemble with clear instructions and minimal tools required. This feature ensures that users can quickly set up their equipment and start rowing without frustration or delay.
What Materials Should You Choose for Building a DIY Rowing Machine?
When building a DIY rowing machine, selecting the right materials is crucial for durability, functionality, and comfort.
- Wood: High-quality plywood or hardwood can be used for the frame and seat due to its strength and stability. Wood provides a solid base and can be easily shaped or sanded for comfort, making it a popular choice among DIY builders.
- Metal: Steel or aluminum tubing can be ideal for constructing the frame, offering excellent strength-to-weight ratios. Metal parts can ensure the longevity of the machine while providing a modern aesthetic, though they may require welding or drilling for assembly.
- Resistance Mechanism: Options include bungee cords, resistance bands, or water tanks. Each mechanism offers a different rowing experience; for instance, water tanks provide a realistic rowing feel with dynamic resistance, while bands offer adjustable tension and are easier to source.
- Seat and Footrests: Foam padding or ergonomic seats can enhance comfort during workouts, while adjustable footrests should be used to accommodate various user sizes. Investing in quality materials for these components can significantly improve the overall user experience and prevent discomfort during longer sessions.
- Wheels or Rollers: Smooth, durable wheels or rollers are necessary for a fluid rowing motion. They should be made from materials like rubber or plastic to ensure they glide easily along the track, reducing friction and improving performance.
- Finish and Sealant: A good finish, such as polyurethane or varnish, can protect wood surfaces from moisture and wear. Applying a sealant can also enhance the aesthetic appeal while ensuring the longevity of the machine by preventing damage from sweat and humidity.
How Can You Design and Construct a Homemade Water-Powered Rowing Machine?
Designing and constructing a homemade water-powered rowing machine involves several key components to ensure functionality and efficiency.
- Frame: The frame serves as the foundation of your rowing machine, typically made from sturdy materials like wood or metal for stability. It should be designed to support the water tank, rowing seat, and tracks for the oars, ensuring durability during use.
- Water Tank: The water tank is crucial as it provides resistance while rowing. It should be sealed and made from a transparent material to allow visibility, and it must be large enough to hold sufficient water for effective resistance but not too heavy to hinder movement.
- Rowing Seat: The rowing seat needs to be comfortable and able to glide smoothly along the frame. It should be mounted on rollers or a sliding track to allow for efficient back-and-forth motion, mimicking the action of rowing on water.
- Oars: The oars are essential for the rowing motion and should be designed to create resistance against the water in the tank. They can be made from lightweight materials like PVC or wood, and need to be long enough to allow full range of motion while rowing.
- Resistance Mechanism: The resistance mechanism controls how hard it is to row, which can be adjusted by varying the water level in the tank or adding additional weights. This feature allows users to customize their workout intensity according to their fitness level.
- Pulley System: A pulley system can enhance the rowing experience by providing a more realistic rowing feel and ensuring that effort is evenly distributed. It involves using ropes and pulleys to connect the oars and the seat, allowing for smoother transitions during the rowing motion.
- Finishing Touches: Final adjustments such as sanding down rough edges, adding non-slip surfaces to the seat and footrests, and applying a waterproof finish to the wood can improve safety and comfort. Additionally, consider painting or decorating your rowing machine to personalize it and make it visually appealing.
What Steps Are Involved in Creating a Wooden DIY Rowing Machine?
Creating a wooden DIY rowing machine involves several essential steps to ensure functionality and durability.
- Planning and Design: Before starting, sketch a design of the rowing machine to visualize the dimensions and layout. Consider the materials needed, the type of rowing motion, and how the machine will be used to ensure it meets your fitness goals.
- Gathering Materials: Collect all necessary materials such as plywood, wooden dowels, screws, and a comfortable seat. Choosing high-quality wood will enhance durability and performance, while additional components like resistance bands or a flywheel can add complexity and functionality.
- Cutting the Wood: Use a saw to cut the wood according to your design specifications. Ensure precise measurements for each piece, including the frame, seat, and footrests, as this will impact the machine’s stability and comfort during use.
- Assembling the Frame: Begin constructing the main frame by connecting the cut wood pieces using screws and wood glue for added strength. Make sure to create a sturdy base that can handle the forces exerted while rowing, paying attention to the alignment of each component.
- Attaching the Seat and Rail: Install the seat on a smooth rail for easy sliding back and forth. Use rollers or gliders if necessary to ensure a smooth rowing motion, and secure the seat well to prevent wobbling during workouts.
- Installing Footrests: Attach footrests at a comfortable height and angle to allow for proper rowing technique. Foot straps can be added to keep feet secure during use, ensuring safety and efficiency while exercising.
- Adding Resistance Mechanism: Incorporate a resistance system, such as rubber bands or a flywheel, that allows for adjustable intensity levels. This feature will enable users to customize their workouts and improve their rowing experience.
- Finishing Touches: Sand the entire structure to remove any sharp edges and apply a sealant or varnish to protect the wood from moisture and wear. Ensure that all moving parts are functioning smoothly and that the machine is stable before testing it out.
- Testing and Adjustments: Once assembled, conduct a thorough test of the rowing machine to ensure it operates safely and effectively. Make any necessary adjustments to improve comfort, stability, or resistance levels based on your initial testing.
How Do You Build a Resistance Band Rowing Machine?
Building a resistance band rowing machine can be an effective DIY project for home fitness enthusiasts.
- Materials Needed: Gather resistance bands, a sturdy frame (like a wooden or metal structure), a seat, and a footplate.
- Assembly of the Frame: Construct or repurpose a frame that is stable and able to support your weight during rowing.
- Attaching the Resistance Bands: Secure the resistance bands to the frame at one end, ensuring they can stretch adequately to provide resistance.
- Creating the Seat: Design a comfortable seat that can slide back and forth along the frame, mimicking the motion of a rowing machine.
- Footplate Installation: Install a footplate that holds your feet securely while allowing for a full range of motion during the rowing action.
- Testing and Adjustments: Test the machine for stability and comfort, making any necessary adjustments to the resistance or seating position for optimal performance.
The materials needed include high-quality resistance bands that can withstand repeated stretching, along with a robust frame that can support the rowing motion. You can use wood, metal, or even PVC pipes as a base, ensuring it is anchored securely to prevent tipping.
When assembling the frame, focus on a design that mimics the length and height of a commercial rowing machine. This may involve creating a track for the seat to slide on, which can be made from smooth wood or metal rails.
For attaching the resistance bands, make sure they are fastened securely at one end of the frame, ideally with carabiners or hooks that allow for easy adjustment of tension. The other end should be secured to the seat or footplate, so that pulling on the handle will increase resistance as you row.
The seat should be comfortable and able to glide smoothly along the frame, which can be achieved by using wheels or a sliding mechanism. Padding can enhance comfort, allowing for longer workout sessions.
The footplate is crucial for maintaining proper form during rowing, so it should be wide enough to accommodate your feet and provide stability. Non-slip materials can be added to the surface for additional grip.
Finally, after assembling your DIY rowing machine, it’s essential to test it out thoroughly. Pay attention to any wobbling or discomfort and make adjustments as needed to ensure a smooth and enjoyable rowing experience.
What Are the Health Benefits of Using a DIY Rowing Machine?
The health benefits of using a DIY rowing machine include improved cardiovascular fitness, enhanced muscle strength, and increased flexibility.
- Cardiovascular Fitness: Rowing is an excellent aerobic exercise that elevates heart rate and improves lung capacity. Regular use of a rowing machine can lead to better endurance, reducing the risk of heart disease and other cardiovascular issues.
- Muscle Strength: A DIY rowing machine engages multiple muscle groups, including the legs, back, arms, and core. This full-body workout helps build lean muscle mass and tones the body while also promoting fat loss.
- Low Impact Exercise: Rowing is a low-impact activity that puts minimal stress on the joints, making it suitable for individuals of all fitness levels. This allows for longer workout durations without the risk of injury, especially for those recovering from joint or muscle injuries.
- Improved Flexibility: The rowing motion encourages a full range of motion in the joints, promoting flexibility and mobility. Regular use can help prevent stiffness and improve overall functional movement.
- Caloric Burn: DIY rowing machines can provide a high-calorie burn depending on the intensity and duration of the workout. This makes them effective for weight loss or weight management goals.
- Convenience and Cost-Effectiveness: Building your own rowing machine can save money compared to purchasing commercial models while offering the same health benefits. It allows for customization to fit personal space and workout preferences, making it a practical choice for home fitness.
What Safety Precautions Should You Consider When Making a DIY Rowing Machine?
When making a DIY rowing machine, it’s essential to consider several safety precautions to ensure a safe and effective build.
- Quality Materials: Use sturdy and durable materials that can withstand the stress of rowing. Cheap or weak materials may lead to breakage during use, posing risks of injury.
- Proper Tools: Ensure you have the right tools for cutting, assembling, and finishing the rowing machine. Using inappropriate tools can lead to accidents or improper assembly, which could compromise the machine’s safety and functionality.
- Weight Capacity: Design the rowing machine to support the weight of the user plus additional stress from rowing movements. Failing to account for weight limits can result in structural failure and serious injuries.
- Secure Connections: Make sure all joints and connections are securely fastened and reinforced. Loose parts can lead to instability during use, increasing the risk of accidents.
- Testing Stability: Before regular use, test the rowing machine for stability and balance. This ensures that it will not tip over or shift during workouts, providing a safer experience.
- Clear Work Area: Maintain a clean and organized workspace while building the rowing machine. A cluttered area can lead to mishaps or distractions that could cause injury during the building process.