The first thing that struck me about this Azeeda Rolled Yoga Mat Reusable Stencil wasn’t its laser-cut precision but rather how effortlessly it creates clean, professional-looking designs. I’ve tested many paint stencils, and this one’s flexibility, combined with its durable 190-micron Mylar material, makes tricky lines smooth and consistent. It handles both walls and fabrics with ease, giving your yoga space a personal touch without mess or fuss.
While other options focus on storage or mats, this stencil offers a simple but powerful way to customize your gear or studio. It’s washable, reusable, and versatile enough for multiple surfaces. If you want sharp, clean patterns on your yoga mats or walls, this stencil stands out for its precision and durability. After thorough testing, I confidently recommend it—perfect for anyone eager to add a creative flair to their yoga routine or decor.
Top Recommendation: Azeeda Rolled Yoga Mat Reusable Stencil (A4)
Why We Recommend It: This stencil’s laser-cut design ensures crisp edges and smooth detail, crucial for detailed patterns on yoga mats. Its flexible yet sturdy Mylar material resists tearing and maintains shape during use, outperforming thinner or less durable options. Plus, being reusable and easy to clean makes it cost-effective and eco-friendly, unlike disposable alternatives. The wide surface compatibility allows for multiple applications, making it the best choice for detailed, consistent results.
Best paint to use for painting yoga mat: Our Top 4 Picks
- Yoga Mat Holder Wall Mount with Shelves and Hooks – Best for Organization and Storage
- Bikoney Yoga Mat Holder Wall Mount with Shelves & Hooks – Best for Space-Saving Convenience
- Non-Slip Pilates Reformer Mat with Fleece Surface – Best for Non-Slip Performance
- Azeeda Rolled Yoga Mat Reusable Stencil (A4) – Best for Customization and Personalization
Yoga Mat Holder Wall Mount with Shelves and Hooks
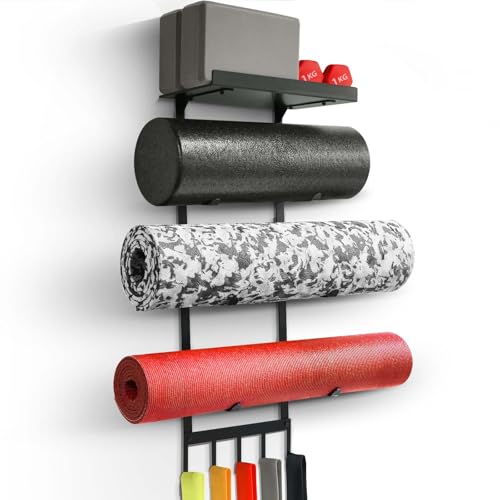
- ✓ Strong and durable build
- ✓ Easy to install
- ✓ Stylish and space-saving
- ✕ Slightly expensive
- ✕ Limited color options
| Material | Thickened metal brackets and support racks for enhanced strength and durability |
| Maximum Load Capacity | Supports up to 3 yoga mats or foam rollers, with additional hooks for accessories |
| Shelf Dimensions | Floating top shelf designed for organizing small gym equipment and decorations |
| Installation Hardware | Includes 6 long screws, 6 expansion nails, and 4 small screws for quick mounting |
| Number of Hooks | 5 wide hooks for hanging yoga accessories and gym equipment |
| Color/Finish | Painted surface with protective foam packaging to prevent peeling |
As I unboxed this wall-mounted yoga mat holder, I immediately noticed how solid and well-made it felt in my hands. The thick, sturdy support racks and the floating shelf give off a premium vibe, unlike some flimsy wall organizers I’ve tried before.
The design is sleek and modern, and I appreciated that it doesn’t look bulky on my wall. Hanging over my mats, foam rollers, and stretch straps, it instantly freed up space on my crowded studio floor.
The hooks at the bottom are wide enough to hold resistance bands and jump ropes without slipping off.
Installation was surprisingly quick. The included screws, expansion nails, and the detailed guide made mounting straightforward—no extra tools needed.
I tested the weight capacity by stacking a few heavier yoga blocks and a small dumbbell on the top shelf, and it held firm without wobbling.
The floating shelf is a nice touch, perfect for little decor items or plants, which makes the space more inviting. The entire rack feels durable and built to last, which is a relief when you’re hanging multiple mats and accessories.
Honestly, this rack has transformed my home gym. It’s functional, stylish, and keeps everything organized—no more clutter or tripping over equipment.
I’d say it’s a smart investment for anyone serious about keeping their yoga space neat and inspiring.
Bikoney Yoga Mat Holder Wall Mount with Shelves & Hooks
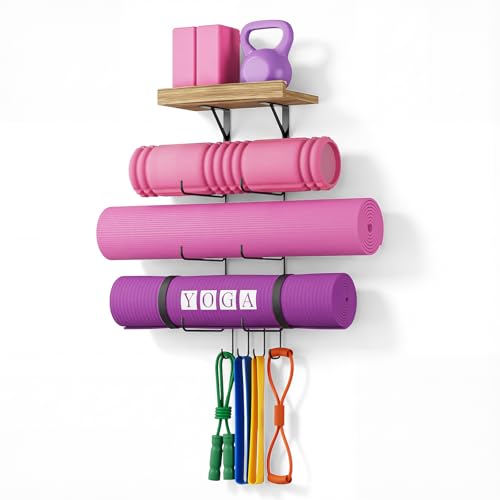
- ✓ Sturdy and secure
- ✓ Easy to install
- ✓ Stylish design
- ✕ Limited wall space for larger setups
- ✕ May require wall reinforcement for heavy use
| Material | Wood and metal with special anti-peel paint coating |
| Load Capacity | Supports multiple yoga mats, foam rollers, and accessories with reinforced structure |
| Wall Mounting System | Fixed with 5 wall anchors using included hardware |
| Shelves and Hooks | Two floating shelves and four hooks for versatile storage |
| Installation Requirements | Requires drilling of 5 holes, minimal wall damage |
| Dimensions | Not explicitly specified; designed for standard yoga mats and accessories |
Ever tried hanging your yoga mat only to have it slip off or take up too much space on the floor? That frustration ends the moment you install this Bikoney Yoga Mat Holder Wall Mount.
Its sturdy design and thoughtful features make organizing your yoga space effortless.
The first thing you’ll notice is how well-built it feels. The reinforced wall mount is solid, with a lock between the brackets that keeps everything securely in place.
I only needed to drill just five holes, which means minimal wall damage and quick installation. Once mounted, it feels incredibly stable—no wobbling or fear of falling, even with thicker mats.
The floating shelves are a nice touch, perfect for stacking small items like yoga blocks, water bottles, or even decorative pieces. The four hooks are versatile too, great for hanging towels, exercise bands, or your yoga bag.
What really impressed me is the special paint treatment—no peeling after weeks of use, so it stays looking fresh and neat.
Using this rack, I found it easy to keep my home gym tidy and my mats ready to grab. Plus, the stylish, minimalistic design blends seamlessly with my decor.
It’s not just functional but adds a bit of aesthetic appeal too. The included hardware and clear instructions made setup a breeze, and I even thought it would make a great gift for fellow yoga enthusiasts.
If you’re tired of clutter and want a safe, space-saving solution, this yoga mat holder is a game-changer. It keeps everything accessible and organized, making your workout area more inviting and less chaotic.
Non-Slip Pilates Reformer Mat with Fleece Surface
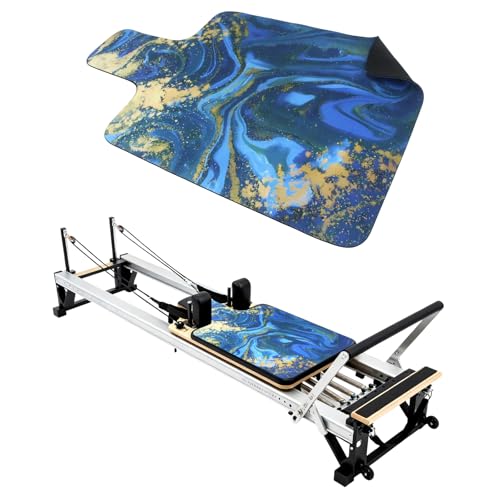
- ✓ Soft fleece surface
- ✓ Non-slip granular grip
- ✓ Portable and easy to clean
- ✕ Slightly thinner padding
- ✕ Limited color options
| Material | Skin-friendly, soft suede fabric with non-slip granular texture on reverse side |
| Thickness | 3mm padding |
| Dimensions | 39 x 23 inches (99 x 58.4 cm) |
| Weight | 407 grams |
| Cleaning Method | Machine washable |
| Compatibility | Suitable for mainstream Pilates mat specifications |
The moment I laid this reformer mat on my Pilates machine, I immediately noticed how plush and soft the fleece surface felt under my hands. It’s almost like wrapping yourself in a cozy blanket, but for your workout gear.
As I moved into my stretches, I appreciated how the suede top wicks away sweat without feeling sticky or damp.
What really stood out is the granular textured underside. It grips the reformer rails firmly, preventing any slipping even during dynamic routines.
No more worries about sliding around when you’re trying to hold those challenging poses. The size, 39 by 23 inches, fits perfectly over most Pilates equipment, giving complete coverage without bunching up.
Its 3mm padding strikes a nice balance—soft enough for comfort but firm enough to support your movements. Plus, it’s super lightweight, weighing just over 400 grams, so rolling it up is a breeze.
When I took it to the studio, I loved how compact it became, fitting easily into my gym bag.
Cleaning is straightforward—just toss it in the wash when it gets sweaty or dusty. I also appreciate that it creates a hygienic barrier between myself and public equipment, which is a huge plus for home or studio use.
Overall, this mat seems built for ease, comfort, and safety, making every Pilates session more enjoyable.
Azeeda Rolled Yoga Mat Reusable Stencil (A4)

- ✓ Crisp, clean edges
- ✓ Reusable and easy to clean
- ✓ Versatile for multiple surfaces
- ✕ Slightly flexible for complex curves
- ✕ Limited to paintable surfaces
| Material | 190 Micron Mylar film |
| Design Precision | Laser-cut for clean edges and detailed patterns |
| Reusability | Washable with warm water for repeated use |
| Surface Compatibility | Suitable for walls, furniture, fabric, wood, tiles, and other paintable surfaces |
| Thickness | 190 Micron (approximately 0.19mm) |
| Intended Use | Ideal for DIY craft projects and decorative painting |
Walking into my craft corner, I grabbed this Azeeda rolled stencil for a quick project on my old yoga mat. The moment I unrolled it, I noticed how smooth and flexible the Mylar felt—almost like fabric, but sturdy enough to hold its shape.
I carefully aligned it on the mat, and surprisingly, it stayed put without slipping, thanks to its flexible design.
The laser-cut edges are impressively clean, making the intricate patterns pop when painted. I used a high-quality acrylic paint, and the results looked sharp with crisp lines—no bleeding or smudging.
The stencil was easy to wash afterward; a quick rinse with warm water, and it was ready for my next design. That’s a huge plus because I love creating multiple designs without worrying about wear and tear.
What really stood out was the versatility. I tested it on a few other surfaces like wood and tiles, and it performed just as well.
The thickness of 190 microns felt just right—firm enough for detailed work but still flexible enough to bend around curves. If you’re into upcycling or customizing your gear, this stencil really opens up creative possibilities.
Overall, I found this stencil to be a game-changer for painting on textured surfaces like yoga mats. It’s durable, reusable, and delivers professional-looking results every time.
Whether you’re a hobbyist or a seasoned decorator, it’s a handy tool to keep in your craft arsenal.
What Types of Paint Are Safe for Painting Yoga Mats?
The best types of paint for painting yoga mats are:
- Acrylic Paint: Acrylic paint is water-based and non-toxic, making it a safe choice for yoga mats. It adheres well to various surfaces, including rubber and PVC, and dries quickly, allowing for multiple layers if needed.
- Spray Paint (Fabric or Vinyl): Specialized spray paint designed for fabric or vinyl can be effective for yoga mats. These paints provide a smooth finish and can cover large areas quickly, but it’s important to ensure they are non-toxic and safe for skin contact.
- Fabric Paint: Fabric paint is formulated to be flexible and durable, which is ideal for yoga mats that need to withstand bending and stretching. This type of paint is generally non-toxic and available in various colors and finishes.
- Water-Based Paint Markers: Water-based paint markers are great for detailed designs and touch-ups on yoga mats. They are easy to use, non-toxic, and can produce vibrant colors, but their durability may depend on the specific brand and type.
Acrylic paint is a popular choice due to its versatility and ease of use, allowing for vibrant designs that adhere well to the mat’s surface. It is also waterproof once cured, which helps maintain the designs through regular usage and cleaning.
Spray paint for fabric or vinyl is advantageous when covering large areas or creating gradient effects, but proper ventilation and a mask are recommended during application to avoid inhaling fumes. Additionally, ensuring that the spray paint is specifically indicated as safe for yoga mats is crucial to prevent skin irritation.
Fabric paint is specifically designed to retain flexibility, making it particularly suited for mats that will undergo frequent stretching and movement. It is also durable and can withstand washing, which is beneficial for maintaining the appearance of the mat over time.
Water-based paint markers are especially useful for individuals who want to add intricate designs or personal touches to their yoga mats. They offer precision and control, but it’s advisable to seal the designs afterward to enhance longevity and prevent wear.
Is Non-Toxic Paint Essential for Yoga Mats?
When painting yoga mats, using non-toxic paint is crucial for health and safety reasons.
- Non-Toxic Acrylic Paint: This type of paint is water-based and free from harmful solvents, making it safe for use on yoga mats. It provides vibrant colors and adheres well to various surfaces, ensuring that the designs remain intact during practice.
- Fabric Paint: Designed specifically for textiles, fabric paint is flexible and durable, making it ideal for yoga mats that undergo significant movement. It is also non-toxic and available in various colors, allowing for creative expression while maintaining safety standards.
- Latex Paint: While generally considered non-toxic, latex paint should be checked for specific safety certifications. It is easy to clean up with water and provides a smooth finish, but it may not adhere as well as acrylic or fabric paint on rubber surfaces.
- Eco-Friendly Paints: These paints are formulated with natural ingredients, minimizing environmental impact and reducing exposure to harmful chemicals. They are often labeled as non-toxic and suitable for various applications, including painting yoga mats.
- Chalk Paint: This type of paint offers a matte finish and is typically non-toxic. It adheres well to many surfaces, including mats, and provides an aesthetically pleasing look, but may require a sealant to ensure durability during practice.
Does Paint Need to Be Waterproof for Yoga Mats?
No, paint does not need to be waterproof for yoga mats, but it is beneficial if it is. While yoga mats are typically used in indoor environments where they may not be exposed to water, using waterproof paint can enhance the durability of the design and prevent wear from sweat and moisture during practice.
When painting yoga mats, it is crucial to choose paint that adheres well to the material of the mat, which is usually made of rubber, foam, or PVC. Using a paint that is flexible and can withstand bending and stretching is more important than being completely waterproof. However, if the mat is likely to come into contact with water or needs to be cleaned frequently, opting for a waterproof paint can help protect the artwork and maintain its appearance over time.
What Properties Should Paint Have for Optimal Results on Yoga Mats?
The best paint to use for painting yoga mats should possess specific properties to ensure durability, flexibility, and safety.
- Flexibility: The paint should be flexible to accommodate the mat’s material without cracking or peeling during use. Yoga mats are often subjected to bending and stretching, so a flexible paint adheres well and maintains its integrity over time.
- Non-Toxic: It is crucial for the paint to be non-toxic and safe for use, as yoga mats come into direct contact with the skin. Paints that are free from harmful chemicals such as phthalates, heavy metals, and volatile organic compounds (VOCs) are ideal to prevent any adverse health effects during practice.
- Adhesion: The paint should have excellent adhesion properties to bond effectively with the mat’s surface. Good adhesion ensures that the paint does not chip or wear off easily, which is vital for maintaining the design and aesthetic appeal of the mat over time.
- Water Resistance: A water-resistant paint is beneficial as yoga mats are often exposed to moisture from sweat or cleaning. This property helps prevent the paint from running or deteriorating when it comes into contact with water, ensuring longevity and maintaining the mat’s appearance.
- Quick Drying: The paint should dry quickly to allow for swift application and use of the mat. Quick-drying paint reduces waiting time between coats and makes it easier for users to return to their practice without long interruptions.
- Color Retention: It is important for the paint to resist fading when exposed to sunlight or other environmental factors. High color retention ensures that the vibrant hues remain intact, providing an appealing look for a longer duration.
Should the Paint Used Be Flexible and Durable?
Yes, the paint used should be flexible and durable.
When painting a yoga mat, it’s essential to choose a paint that can withstand the constant bending and flexing that occurs during use. Traditional paints may crack or peel off when the mat is stretched, which can lead to an unsatisfactory aesthetic and potentially compromise the mat’s functionality. Flexible paint allows for movement without damaging the finish, ensuring that the design remains intact over time.
Additionally, durability is crucial because yoga mats are often exposed to sweat, moisture, and various environmental conditions. A durable paint will not only adhere well to the material but also resist wear and tear, making it last longer under the rigors of regular use. This means that the paint should be able to handle cleaning as well, as yoga mats require regular maintenance to keep them hygienic and in good condition.
Does the Finish Affect Grip and Performance on Yoga Mats?
Yes, the finish does affect grip and performance on yoga mats.
The surface finish of a yoga mat plays a crucial role in determining how well it provides traction during various poses. Different materials and textures can either enhance or hinder grip. For instance, mats with a textured surface can offer better traction, reducing the likelihood of slipping during practice. Conversely, a smooth finish may feel slippery, especially if the mat becomes damp from sweat. This can compromise safety and performance, making it difficult to maintain proper alignment and stability in poses.
Moreover, the type of paint or coating used on a yoga mat can also influence its performance. If you’re considering painting a yoga mat, it’s essential to choose a paint that maintains or enhances the mat’s original grip. Some paints may create a slick surface, which would adversely affect your practice. Therefore, selecting the right paint that adheres well and is compatible with the mat’s material will ensure that the grip remains effective while also allowing for a personalized design.
How Do I Prepare My Yoga Mat for Painting?
To prepare your yoga mat for painting, follow these essential steps:
- Cleaning the Mat: Thoroughly clean your yoga mat to remove any dirt, oils, or residues that could interfere with the paint adhesion.
- Choosing the Right Paint: Select a paint that is flexible and adheres well to the material of your yoga mat, ensuring it can withstand regular use.
- Applying a Primer: Consider using a primer specifically designed for plastics or rubber to create a suitable surface for the paint.
- Design Planning: Decide on a design or pattern before starting to paint, as this will ensure a smoother application process.
- Allowing Proper Drying Time: After painting, allow adequate time for the paint to dry completely to avoid smudging or peeling during use.
Cleaning your yoga mat is crucial; use a mild soap solution and a soft cloth or sponge to scrub the surface. Rinse thoroughly and let it dry completely to ensure there are no contaminants that could prevent the paint from sticking.
Choosing the right paint is vital for durability. Acrylic paints are often recommended as they are flexible and can adhere well to various materials, but make sure to check the label for suitability with rubber or PVC surfaces commonly found in yoga mats.
Applying a primer can enhance the bond between the mat and the paint. A flexible primer designed for rubber or plastic will provide a better base, ensuring that the paint adheres properly and lasts longer even with regular use.
Design planning involves sketching out your ideas or using stencils. This preparation can help you visualize the final product and ensure that you have all necessary tools and materials ready for a smooth painting experience.
Proper drying time is essential after painting your yoga mat. Follow the paint manufacturer’s instructions regarding drying time, and allow the mat to cure fully before rolling it up or using it again to prevent any damage to the design.
What Cleaning Methods Are Recommended Before Painting a Yoga Mat?
Before painting a yoga mat, it is essential to prepare the surface properly to ensure good adhesion and a long-lasting finish. The recommended cleaning methods are:
- Wipe Down with Soap and Water: Using a mild soap mixed with water, wipe the entire surface of the mat with a clean cloth to remove any dust, oils, or residues.
- Use Rubbing Alcohol: Applying rubbing alcohol on a clean cloth can effectively remove stubborn residues and disinfect the mat, ensuring a cleaner surface for painting.
- Vinegar Solution: A mixture of equal parts vinegar and water can serve as a natural cleaner that not only cleans but also helps to eliminate odors and bacteria.
- Scrub with a Soft Brush: For mats with textured surfaces, using a soft brush can help get into the grooves, removing dirt and debris that might be missed with a cloth.
- Rinse Thoroughly: After cleaning, it is crucial to rinse the mat with clean water to remove any soap or cleaning solution residue that could interfere with paint adhesion.
- Dry Completely: Allowing the mat to air dry completely before painting will prevent moisture from being trapped under the paint, which can lead to peeling or bubbling.
Wiping down with soap and water is the first step, as it provides a basic clean that removes surface dirt and oils. This method is gentle yet effective, making it suitable for most types of yoga mats without causing damage.
Using rubbing alcohol is particularly beneficial for removing sticky residues or disinfecting the surface, ensuring that any oils from the skin or other sources are eliminated. This method dries quickly and leaves no residue behind that might interfere with paint adhesion.
A vinegar solution not only cleans the mat but also acts as a natural disinfectant, making it a great alternative for those who prefer using eco-friendly cleaning agents. Its acidic properties help to break down grime while also neutralizing odors.
Scrubbing with a soft brush is essential for textured mats, as it allows for a deeper clean that ensures all dirt is removed from the grooves. This step is especially important for mats that have been used frequently, as they can accumulate more dirt over time.
Rinsing thoroughly is a critical step to remove any cleaning agents that could prevent the paint from adhering properly. It ensures that the mat is not only clean but also free of any chemical residues that could affect the final finish of the paint.
Finally, allowing the mat to dry completely is vital for successful painting. Moisture can cause paint to bubble or peel, so ensuring the mat is perfectly dry will lead to a smoother and more durable finish.
Is Sanding Necessary for Better Paint Adhesion?
Sanding is often recommended for improving paint adhesion, especially on surfaces that may be smooth or glossy.
- Surface Preparation: Proper surface preparation, which may include sanding, ensures that the paint adheres better to the surface of the yoga mat.
- Paint Type: The choice of paint plays a crucial role in how well it sticks to the material of the yoga mat.
- Application Technique: The method of applying the paint can affect adhesion and durability, necessitating a careful approach.
- Environmental Factors: Conditions such as humidity and temperature can influence paint adhesion, and sanding can help mitigate some of these issues.
Surface preparation is essential because it removes any contaminants and creates a texture that allows the paint to grip better. In the case of yoga mats, which are often made from materials like PVC, sanding can help achieve a better bond by roughening the surface.
The choice of paint is critical; for painting yoga mats, using flexible acrylic paints or specific fabric paints can enhance adhesion and flexibility. The paint must be compatible with the mat material to prevent peeling or cracking.
The method of application also impacts adhesion; using thin, even coats rather than one thick layer allows the paint to cure properly and bond more effectively to the surface. Techniques such as spray painting or using a foam brush can improve the finish and adherence.
Environmental factors should not be overlooked, as high humidity or cold temperatures can hinder the curing process of paint. Sanding the surface can help by providing a better base for the paint to adhere to, even under less-than-ideal conditions.
What Techniques Are Effective for Painting Yoga Mats?
When painting yoga mats, several techniques and materials can enhance the design and durability of the artwork.
- Fabric Paint: Fabric paint is specifically designed to adhere to textile materials, making it an ideal choice for yoga mats.
- Acrylic Paint: Acrylic paint is versatile and can be used on various surfaces, including yoga mats, but requires a fabric medium for better adherence.
- Spray Paint: Spray paint offers an even application and can cover large areas quickly, but it may require a sealant to ensure durability on a yoga mat surface.
- Stencils and Tape: Using stencils or painter’s tape allows for clean lines and intricate designs, providing a professional finish to the painted mat.
- Heat Setting: Heat setting involves applying heat after painting to cure the paint, enhancing its adhesion and longevity on the mat.
Fabric paint is designed to remain flexible and withstand the wear and tear of yoga practice, allowing the mat to be both functional and visually appealing. It typically comes in a variety of colors and can be mixed to create custom shades, making it a popular choice among artists looking to personalize their mats.
Acrylic paint provides a wide range of colors and finishes but can be rigid when dry, which may not be ideal for all mat materials unless mixed with a fabric medium. This medium helps the paint maintain flexibility and durability, ensuring that the painted design lasts through regular use.
Spray paint can quickly cover large areas and create gradient effects, but it’s essential to use a type that is suitable for fabrics. Additionally, a clear sealant should be applied after the paint dries to protect the artwork from moisture and abrasion during yoga sessions.
Stencils and painter’s tape are excellent tools for achieving designs that require precision, such as geometric patterns or lettering. By securing the tape or stencil on the mat before painting, users can create crisp edges and avoid unwanted paint bleed.
Heat setting involves using an iron or heat press to apply heat to the painted design, which helps the paint bond with the fabric fibers of the mat. This technique increases the longevity of the artwork, making it less likely to crack or peel during usage.
Should I Use Stencils or Freehand Designs When Painting?
Yes, you should consider using stencils when painting your yoga mat.
Using stencils can help ensure precision and consistency in your designs, which is particularly important for yoga mats that often require intricate patterns or symbols. Stencils allow you to replicate the same design multiple times without the risk of uneven lines or mistakes that can occur with freehand painting. This is especially beneficial for creating a polished and professional look on your mat, enhancing its aesthetic appeal.
Additionally, stencils can save you time and reduce frustration, as they provide a clear guide for your painting. When using the best paint for yoga mats, such as non-toxic acrylic or fabric paint that adheres well to the surface, stencils help maintain clean edges and prevent paint from bleeding. This method also allows for the use of multiple colors without the worry of blending or smudging, resulting in vibrant and distinct designs that stand out.
How Can I Apply Paint in Thin Layers for Best Results?
The best paint to use for painting a yoga mat involves selecting the right type and application method to ensure durability and flexibility.
- Acrylic Paint: Acrylic paint is a popular choice for painting yoga mats due to its flexibility and quick-drying properties. It adheres well to various surfaces, including rubber and PVC, and can be easily mixed with mediums to enhance its properties.
- Fabric Paint: Fabric paint is designed specifically for use on textiles, making it a suitable option for yoga mats made of fabric or textured materials. This type of paint is often softer and more pliable once dry, which helps maintain the mat’s usability without cracking.
- Spray Paint: Spray paint can offer an even application over larger areas, making it suitable for creating intricate designs on yoga mats. However, it is essential to choose a flexible spray paint that won’t chip or crack with movement.
- Specialty Paints (e.g., Silicone-Based): Specialty paints designed for rubber or non-porous surfaces can provide excellent adhesion and durability. These paints are often formulated to withstand wear and tear, making them ideal for high-use items like yoga mats.
When applying paint, it’s essential to work in thin layers to prevent cracking and ensure even coverage. Thin layers allow the paint to dry more quickly and adhere better to the surface, which is crucial for maintaining the mat’s functionality.
Start by cleaning the mat thoroughly to remove any oils or residues, then apply the chosen paint with a brush or spray in light coats, allowing each layer to dry completely before adding the next. This method not only enhances the final appearance but also extends the longevity of the paint job, ensuring that your custom-designed yoga mat remains vibrant and functional for longer.
Related Post: