Before testing this basketball, I never realized how much the right hand and finger placement could make or break your shot. Spending hours with various training balls showed me that many focus only on aim, but proper hand positioning is key—and that’s exactly what the HOOPSKING Skill Shooter Basketball 28.5 helps with. It has printed hands for both right and left-handed players, plus a clever palm reminder that prevents poor grip, helping you develop consistent form every time.
What stood out in my testing was how quickly beginners improved their shot accuracy, especially with the built-in coaching cues. Unlike generic training balls, this one actively guides your hands, making it perfect for young learners or those refining their technique. I highly recommend it because it combines quality, educational design, and affordability, offering real value over just random practice. If you want a simple but effective way to find *the best position to shoot a basketball*, this tool is a game-changer.
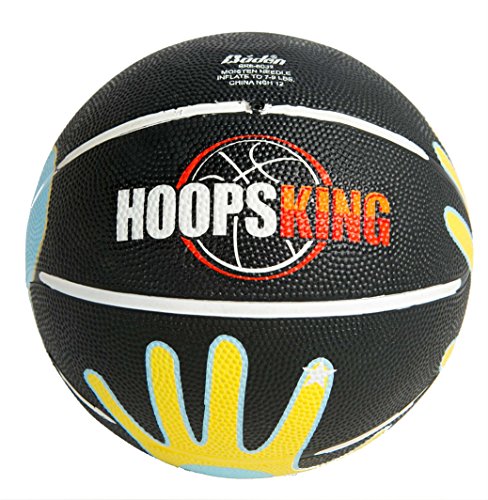
Top Recommendation: HOOPSKING Skill Shooter Basketball 28.5
Why We Recommend It: This product excels because of its dual-handed printed guides, built-in coaching features, and multiple sizes, making it versatile for all players. Its clear hand placement cues address common shooting mistakes and promote correct form. Compared to others, its focus on coaching rather than just playability makes it the best choice for developing consistent shooting habits.
Best position to shoot a basketball: Our Top 5 Picks
- HOOPSKING Skill Shooter Basketball 28.5 – Best for Improving Shooting Technique
- Franklin Sports Shoot Again Basketball – Best for Practicing Shooting Repetition
- BALSMART Youth Basketball Shot Trainer Size 6/28.5” – Best Value
- Blufree Indoor Arcade Basketball Game with 4 Balls & Pump – Best for Fun and Casual Shooting Practice
- SereneLife Indoor Basketball Game with LED Scoreboard, Blue – Best for Competitive Play and Skill Development
HOOPSKING Skill Shooter Basketball 28.5
- ✓ Clear visual hand cues
- ✓ Built-in coaching features
- ✓ Multiple size options
- ✕ Slightly pricey
- ✕ Limited to practice use only
| Size | 28.5 inches (Intermediate size) |
| Intended Users | Suitable for both right-handed and left-handed shooters |
| Color Coding | Yellow for left-handed shooters, Blue for right-handed shooters |
| Design Features | Hands printed for proper hand placement, palm reminder circle to avoid using palm when shooting |
| Material | Likely rubber or composite suitable for indoor/outdoor play |
| Additional Features | Built-in coach for hand positioning and learning shooting techniques |
Many assume that a basketball with visual handprints and color cues might be more of a gimmick than a real training tool. But I found that the HOOPSKING Skill Shooter actually helps you focus on proper hand placement every time you shoot.
The printed hands for both right and left-handed shooters are clearly visible and easy to remember. The colors—yellow for lefties and blue for righties—make it simple to identify your dominant side at a glance.
What really surprised me was the built-in coach feature. The circle on the palm reminds you not to use your palm when shooting, which is a common mistake beginners make.
Handling the ball feels natural thanks to the size options—whether you choose the Intermediate 28.5″ or the smaller Jr. 27.5″.
The size feels just right for practicing at home or in the gym.
Another thoughtful touch is the visual cue for weak hand layups. It really encourages practicing with your non-dominant hand, building more versatility in your game.
Overall, I found it durable and well-made, with a good grip that doesn’t slip during shots. It’s lightweight enough to carry around for quick drills or casual play.
Whether you’re working on your shooting form or helping a kid learn proper technique, this hoop helps build muscle memory and confidence. It’s simple but effective, making it a great addition to any basketball practice routine.
Franklin Sports Shoot Again Basketball

- ✓ Automatic rebounding and passing
- ✓ Adjustable height
- ✓ Electronic scoreboard and crowd noise
- ✕ Slightly expensive
- ✕ Shorter lifespan with heavy use
| Backboard Material | Durable plastic with over-the-door mounting system |
| Hoop Diameter | 12 inches (standard mini hoop size) |
| Adjustable Height Range | Approximately 4 to 6 feet |
| Rebounder Type | Automatic with ball return system |
| Electronic Scoreboard | LED display with built-in timer and crowd noise effects |
| Included Ball | Mini foam basketball |
While setting up what I thought would be a simple mini hoop, I was surprised to find how much this Franklin Sports Shoot Again Basketball set actually elevates your practice routine. The automatic rebounder and passer attach seamlessly over the door, and I was impressed by how smoothly it fed the ball back after each shot.
It’s like having a personal coach that keeps the game flowing without constant manual resets.
The adjustable height feature really stands out. I was able to dial it up or down in seconds, making it perfect for both kids and adults.
It’s lightweight but sturdy enough to withstand some serious shooting practice. Plus, the rotating passer covers a full 180 degrees, so you can simulate different angles—kind of like a real game scenario, which is rare in mini hoops.
The electronic scoreboard and crowd noise really add to the fun. Watching my score update and hearing the crowd cheer made me feel like I was at a real game.
The LED display is bright and easy to read, even from across the room. And since it comes with a foam basketball, I didn’t need to hunt for extra gear to start shooting right away.
All in all, it’s surprisingly engaging and makes practicing feel less like a chore. Whether you’re trying to improve your shot or just have some fun, this set delivers on multiple fronts.
The only downside? It’s a bit pricier than some basic mini hoops, but the features make it worth it for serious practice sessions.
BALSMART Youth Basketball Shot Trainer Size 6/28.5”

- ✓ Guides proper hand placement
- ✓ Durable foam rubber build
- ✓ Suitable for indoor & outdoor use
- ✕ Shipped deflated (needs pump)
| Size | Youth size 6 / 28.5 inches |
| Material | High-quality foam rubber |
| Intended Use | Indoor and outdoor basketball training |
| Design Features | Hand positioning graphics (blue for right-handed, yellow for left-handed) |
| Durability | Wear-resistant and suitable for various venues |
| Shipping Note | Shipped deflated (without pump) |
Instead of the usual rubbery, bounce-heavy basketballs I’ve handled, the BALSMART Youth Basketball Shot Trainer feels surprisingly solid in your hands. Its foam rubber surface gives it a premium, almost like a real ball’s grip, but with a softer touch that’s perfect for kids or beginners.
The standout feature is the hand-on graphics—blue for righties and yellow for lefties—that instantly guide your hand placement. You’ll notice yourself adjusting your grip and shooting form naturally, especially during drills.
It’s like having a coach right there with you, helping build muscle memory for proper shooting technique.
Although it’s a smaller size, at 28.5 inches, it feels full enough to simulate a real game ball, which is great for building confidence. The durability is impressive, holding up well outdoors on concrete or indoors on wooden floors without losing shape or grip.
Plus, it’s lightweight enough to toss around without fatigue but still feels substantial during shooting practice.
Shipped deflated, I recommend having a pump handy, but that’s a minor inconvenience. I found it ideal for both individual training and group sessions, especially because it’s versatile across different courts and terrains.
Whether you’re working on your shot arc or just improving consistency, this trainer makes a noticeable difference.
At just under $20, it’s a smart investment for young players eager to refine their shot. It’s durable, instructive, and versatile—everything you need to turn practice into real progress.
Blufree Indoor Arcade Basketball Game with 4 Balls & Pump

- ✓ Adjustable height for all ages
- ✓ Easy to set up and move
- ✓ Rebounds balls automatically
- ✕ Slightly lightweight frame
- ✕ Limited outdoor durability
| Adjustable Height Range | Suitable for children of various heights, adjustable to accommodate growth |
| Basketball Size | Standard size 7 (29.5 inches circumference) |
| Number of Balls Included | 4 balls |
| Material | Lightweight plastic and metal components |
| Portability | Very lightweight and easy to move around |
| Setup and Assembly | Easy to assemble with included accessories and pump |
The moment I saw how smoothly the hoop adjusted to different heights, I knew this was designed with kids in mind. It’s a simple twist of the knob, and suddenly, my 8-year-old’s shot is perfectly aligned, even as he grows.
No more awkward shots or mismatched heights—just pure fun.
The included pump makes inflating the four balls a breeze, so I didn’t have to hunt for a separate air pump. The balls feel lightweight but sturdy, and the rebound feature means I hardly have to chase after missed shots.
It’s honestly a game changer for keeping kids active, especially during bad weather when outdoor play isn’t an option.
Setting it up took me less than ten minutes. All the pieces click together easily, and the net feels solid but lightweight enough to move around easily.
I appreciate that it’s so portable—one day I had it in the living room, the next outside on the patio. Plus, the colorful design instantly grabs everyone’s attention.
Playing with this feels like a mini arcade experience right at home. It’s perfect for kids’ parties or a quick stress buster after work.
I love that it’s suitable for multiple ages and helps improve hand-eye coordination without feeling like a chore. Honestly, it’s become a staple in our family game nights.
SereneLife Indoor Basketball Game with LED Scoreboard, Blue

- ✓ Space-saving fold out design
- ✓ Full-size shooting distance
- ✓ Easy to store and move
- ✕ Requires batteries
- ✕ Not suitable for outdoor use
| Shooting Distance | Full size 80 inches |
| Basketball Size | Standard indoor regulation size (size 7 or 29.5 inches diameter) |
| Rim Material | Powder coated steel |
| Net Type | Upgraded nylon/netting |
| Scoreboard | LED electronic scoreboard with magnetic score keeper |
| Frame Material | Heavy-duty steel with durable MDF board |
You know that frustrating moment when you’re trying to practice your shots, only to realize your space isn’t really built for full-sized hoops? I’ve been there, cluttered corners and all.
Then I set up the SereneLife Indoor Basketball Game, and suddenly, my cramped living room felt like a mini arcade.
This thing folds down from 80 inches to just 32 inches, so storing it afterwards is a breeze. I love how quick it is to set up or pack away, which means I actually use it instead of letting it gather dust.
The full-size 80-inch shooting distance is surprisingly legit for home use, giving me that real basketball feel without heading to the gym.
The LED scoreboard is a game-changer—seriously, it keeps score with magnetic accuracy, so no disputes over points. Plus, it’s easy to control with just a few buttons, and the multiple game settings add variety.
The sturdy steel rim, upgraded net, and heavy-duty frame make me confident it can handle my rougher shots.
The rubber balls are a nice touch—hot shot style—and the included pump makes inflating them super simple. I’ve found myself shooting for hours, trying to beat my high score, all while barely taking up space.
Overall, this setup turns any room into a fun, competitive zone that’s perfect for all ages.
What Is the Best Position to Shoot a Basketball?
The best position to shoot a basketball involves a combination of body alignment, balance, and technique. Proper positioning enhances accuracy and power and can be broken down into several key components:
-
Feet Placement: Stand shoulder-width apart, with your shooting foot slightly ahead of the other. This stance promotes stability and balance during the shot.
-
Knees Bent: Slight bending of the knees aids in generating power for the shot. This helps maintain a low center of gravity, improving balance.
-
Grip and Hand Position: Position your shooting hand under the ball and your guide hand on the side. Keep your shooting wrist relaxed, with a slight upward tilt to ensure a natural follow-through.
-
Elbow Alignment: Your shooting elbow should sit directly under the ball and aligned with the basket. This alignment promotes a straight trajectory and minimizes lateral movement.
-
Eyes on Target: Focus on the rim or the back of the hoop. Maintaining visual contact with your target enhances concentration and ensures accurate aim throughout the shooting motion.
Practicing these fundamentals while shooting at various distances can greatly improve shooting proficiency.
Why Is the Shooting Position Critical for Scoring?
According to a study published in the Journal of Sports Sciences, optimal shooting positions can enhance the likelihood of making a basket by aligning the shooter’s body in a way that maximizes force generation and promotes a consistent release angle (Baker & Naylor, 2020). This research indicates that the position of the feet, hips, and shoulders plays a significant role in how effectively a player can deliver the ball to the hoop.
The underlying mechanism involves biomechanics, where the shooter’s stance affects their center of gravity and stability. A well-balanced position allows for a smoother shooting motion, reducing the chances of deviation during the shot. When players adopt the best position to shoot a basketball—typically with their feet shoulder-width apart and knees slightly bent—they are better equipped to absorb and transfer energy through their body. This kinetic chain is essential for achieving optimal shot power and accuracy, as it ensures that the shooter can maintain control throughout the shooting motion (Fletcher & MacIntyre, 2018).
Moreover, the angle at which the ball is released is heavily influenced by the shooting position. Research has shown that a higher release point generally correlates with increased shooting percentages, as it helps the shooter avoid defenders and increases the arc of the shot (Kirkendall et al., 2019). Therefore, adopting the correct shooting position not only enhances biomechanical efficiency but also increases the shooter’s ability to create space and execute successful shots under pressure.
How Does Foot Placement Affect My Shooting Accuracy?
Foot placement is crucial for shooting accuracy in basketball, as it influences balance, power, and alignment.
- Shoulder-Width Stance: A shoulder-width stance provides a solid foundation for balance during a shot. This position allows for a stable base, enabling the shooter to maintain control over their body while generating power through their legs.
- Feet Parallel to the Basket: Positioning the feet parallel to the basket helps in aligning the body correctly for the shot. When the feet are aligned with the target, it facilitates a straighter shot trajectory, improving accuracy and consistency.
- Weight Distribution: Proper weight distribution is essential for effective shooting. Shooters should have their weight slightly forward on the balls of their feet, which aids in transferring energy from the lower body through to the shot, enhancing both power and precision.
- Angle of the Feet: The angle at which the feet are placed can affect the shooter’s follow-through. By slightly angling the shooting foot towards the basket, it can help ensure the shooting arm aligns correctly during the release, contributing to a more fluid shooting motion.
- Back Foot Position: The position of the back foot also plays a role in stability and control. Keeping the back foot back and engaged provides additional support and prevents the shooter from leaning too far forward, which can lead to off-balance shots.
What Role Does Body Alignment Play in Finding the Best Position?
Body alignment is crucial in determining the best position to shoot a basketball effectively.
- Feet Placement: Proper foot placement establishes a stable base for shooting. Feet should be shoulder-width apart, with the shooting foot slightly ahead to maintain balance and support during the shot.
- Knees Flexion: Flexed knees help in generating power and providing stability. A slight bend allows for better control and helps in transferring energy from the lower body into the shot.
- Hip Orientation: The hips should face the basket to ensure a direct line of sight and power transfer. Proper hip orientation assists in aligning the upper body with the target, leading to improved accuracy.
- Shoulder Alignment: Shoulders should be squared towards the hoop, facilitating a straight shooting motion. This alignment minimizes the risk of twisting during the shot, which can lead to poor accuracy and consistency.
- Elbow Position: The shooting elbow must be under the ball and aligned with the hoop for a clean shot. This position ensures that the force is directed straight toward the target, enhancing both power and accuracy.
- Head and Eye Position: Keeping the head steady and eyes focused on the target is essential for precision. A fixed gaze allows for better spatial awareness and helps in maintaining focus on the rim during the shooting motion.
What Are the Common Types of Shooting Positions in Basketball?
The common types of shooting positions in basketball significantly influence a player’s effectiveness in scoring.
- Jump Shot: The jump shot is one of the most fundamental shooting techniques in basketball. It involves the player jumping while simultaneously releasing the ball at the peak of their jump, allowing for a higher release point and making it more difficult for defenders to block the shot.
- Set Shot: The set shot is characterized by a stationary stance where the shooter plants their feet and takes a shot without jumping. This position is often used for free throws or when a player has time to set up for a shot, providing greater accuracy due to the stability of the body.
- Layup: A layup is a close-range shot taken while moving towards the basket, usually with one hand. Players often use this position when driving to the hoop, as it allows for a quick release and the ability to adjust the shot based on defensive pressure.
- Three-Point Shot: The three-point shot is taken from beyond the arc and requires not only strength but also precise timing and footwork. Successful execution of this shot can stretch the defense and create additional scoring opportunities, making it a vital skill in modern basketball.
- Bank Shot: A bank shot is when a player aims to bounce the ball off the backboard before it goes into the hoop. This technique can be effective from angles where a direct shot might be more difficult, as the backboard provides a larger target for making the basket.
How Does the Spot-Up Shooter Position Work?
The spot-up shooter position is crucial in basketball, emphasizing the importance of positioning for effective shooting opportunities.
- Feet Placement: Proper foot placement is essential for balance and stability during a shot.
- Knees Bend: Bending the knees helps generate power and allows for a smoother shooting motion.
- Hand Positioning: The shooting hand should be under the ball, while the guide hand holds it steady, ensuring accuracy.
- Body Alignment: Aligning the body towards the basket enhances shooting precision and consistency.
- Quick Release: A quick shot release is vital for capitalizing on open looks and minimizing defensive pressure.
Feet placement involves having your feet shoulder-width apart to maintain a solid base, allowing you to pivot and adjust while shooting. This stance not only supports balance but also aids in generating the necessary upward force when jumping to shoot.
Knees bend to create a spring-like effect, which is essential for lifting off the ground. This motion helps in transferring energy from the legs to the upper body, making the shot more powerful and controlled.
Hand positioning is crucial, as the shooting hand must control the ball while the guide hand stabilizes it. This technique ensures that the shooter can focus on the target and release the ball accurately without unnecessary spin.
Body alignment towards the basket means that the shooter’s shoulders, hips, and feet are directed at the hoop. This alignment is key to ensuring that the shot trajectory is straight and that the shooter is in the best position to follow through properly.
A quick release is essential for spot-up shooters to react swiftly to passes and take advantage of defensive lapses. By practicing an efficient shooting motion, players can increase their chances of scoring before defenders can close out.
What Makes the Off-the-Dribble Shooter Position Unique?
The off-the-dribble shooter position is unique due to its emphasis on creating shot opportunities through movement and ball handling.
- Ball Handling: Off-the-dribble shooters excel in their ability to control the ball while moving, allowing them to create their own shot rather than relying on set plays. This skill requires a combination of dribbling techniques and quick decision-making to navigate through defenses effectively.
- Shot Creation: This position allows players to create space for their shots by using various dribble moves, such as crossovers or step-backs. By creating separation from defenders, off-the-dribble shooters can take high-percentage shots even under pressure.
- Footwork and Balance: Proper footwork is crucial for off-the-dribble shooters to maintain balance while shooting after a dribble. Effective foot placement and body control help ensure a smooth shooting motion, which is essential for accuracy and consistency.
- Read and React Skills: Off-the-dribble shooters must constantly read the defense to determine when to shoot, pass, or drive. This ability to quickly assess defensive positioning enhances their effectiveness and versatility on the court.
- Confidence and Mental Toughness: The ability to take and make shots off the dribble often requires a high level of confidence and resilience. Players in this position must be willing to take risks and embrace the pressure of difficult shooting situations.
What Techniques Can Help Me Achieve the Best Shooting Position?
To achieve the best shooting position when playing basketball, several techniques can be employed:
- Stance: A balanced stance is crucial for stability and power. Position your feet shoulder-width apart, with your shooting foot slightly ahead to provide a solid base and allow for a natural weight transfer during the shot.
- Grip: The way you hold the ball significantly impacts your shot. Use your shooting hand to control the ball while your non-dominant hand acts as a guide; this helps maintain consistency and accuracy in your shooting form.
- Knees Bent: Bending your knees slightly prepares your body for the upward motion of the shot. This not only provides additional power but also helps in maintaining balance and control as you rise to shoot.
- Elbow Alignment: Keeping your shooting elbow aligned with the basket is critical for accuracy. Your elbow should be directly under the ball and in line with your shoulder, facilitating a straight shot path.
- Follow Through: A proper follow-through is essential for ensuring the ball travels on the intended arc. Extend your shooting arm fully and snap your wrist, allowing your fingers to point toward the basket, which helps in maintaining the correct shooting angle.
- Head Position: Keeping your eyes focused on the target is vital. Maintain your head steady and your eyes on the rim during the shot, which aids in visualizing your target and improving shooting accuracy.
- Practice Shooting Drills: Incorporating various shooting drills into your practice routine can enhance your muscle memory and shooting mechanics. Drills like free throws, spot shooting, and game-like situations can help reinforce the techniques learned and improve overall performance.
How Can Practice Drills Improve My Shooting Position?
Practice drills can significantly enhance your shooting position by reinforcing proper techniques and building muscle memory.
- Form Shooting Drills: These drills focus on perfecting the fundamental shooting form without the distraction of distance or defense.
- Spot Shooting Drills: These involve shooting from designated spots on the court, which helps develop consistency and confidence in various shooting positions.
- Game-Situation Shooting Drills: These drills simulate real game scenarios, allowing players to practice their shooting under pressure and while in motion.
- Footwork Drills: Proper footwork is crucial for achieving the best position to shoot; these drills help players establish balance and positioning before taking a shot.
- Repetition and Consistency Drills: Repeating shots from the same spot helps players refine their shooting technique and find their optimal shooting posture.
Form Shooting Drills: By concentrating on the mechanics of shooting, including hand placement, elbow alignment, and follow-through, players can develop a reliable shooting form. Practicing close to the basket allows for immediate feedback and correction, ultimately leading to better shooting posture when shooting from longer distances.
Spot Shooting Drills: These drills typically require players to shoot from specific spots around the court, such as the corners and wings. This helps players learn their shooting range and develop a rhythm in their shooting motion, ensuring they can replicate their form regardless of where they are shooting from on the court.
Game-Situation Shooting Drills: Incorporating elements like a defender or a shot clock into shooting practice mimics real-game pressure. This enables players to adapt their shooting position and technique when faced with challenges, improving their performance during actual games.
Footwork Drills: Effective footwork sets the foundation for a stable shooting position. Drills that focus on proper foot placement and movement ensure that players can quickly get into their best shooting stance, which is essential for accuracy and power.
Repetition and Consistency Drills: The principle of “practice makes perfect” applies here; by repeatedly shooting from the same spot, players can build a consistent shooting motion and refine their balance. This consistent practice allows players to find their ideal shooting position, leading to improved shot accuracy over time.
What Common Mistakes Should I Avoid When Shooting?
When aiming to improve your basketball shooting technique, avoiding common mistakes is crucial.
- Incorrect Foot Placement: Proper foot placement is essential for balance and power in your shot. Many shooters fail to position their feet shoulder-width apart, which can lead to instability and poor shot accuracy.
- Inconsistent Shooting Motion: A consistent shooting motion helps develop muscle memory, making your shots more reliable. If your shooting form varies from shot to shot, it can negatively impact your accuracy and rhythm.
- Neglecting Follow-Through: The follow-through is vital for ensuring your shot has the right arc and direction. Failing to complete your follow-through can result in shots that fall short or miss their target entirely.
- Overlooking Mental Focus: Shooting is as much a mental game as it is physical. Many players underestimate the importance of staying mentally engaged and focused, which can lead to hesitation and reduced confidence during shooting.
- Not Practicing from Game Situations: Shooting in practice should mimic game situations to be effective. Avoiding this can leave players unprepared for the pressure and dynamics of real games, leading to poor shooting performance under stress.
What Can I Learn from Professional Athletes About Shooting Position?
You can learn several key elements from professional athletes about the best position to shoot a basketball.
- Stance: A balanced and stable stance is crucial for shooting accuracy.
- Hand Placement: Proper hand placement on the ball affects the shot’s trajectory and control.
- Knees and Elbow Alignment: Ensuring that your knees and shooting elbow are aligned helps maintain a straight shot.
- Follow Through: A consistent follow-through is essential for accuracy and ensuring the ball has the right spin.
- Body Positioning: Your body should face the basket to optimize shooting angles and power.
The stance is the foundation of a good shot; players typically adopt a shoulder-width stance with their feet slightly pointed towards the basket to ensure balance and support during the shooting motion.
Hand placement involves the dominant hand being under the ball for support while the non-dominant hand guides it; this positioning helps in controlling the shot and achieving a consistent release.
Knees and elbow alignment is vital; bending the knees prepares the body to generate power, and keeping the elbow directly under the ball ensures a straight shot path when releasing.
The follow-through should be a natural extension of the shooting motion, with fingers pointing towards the basket, which not only promotes accuracy but also allows for better backspin on the ball.
Body positioning is about alignment with the basket; having your body square to the rim enhances shooting angles and allows for better use of your legs in generating power for the shot.
Related Post: